Convert2RHEL on Oracle Linux with Satellite

This began as a pet project a while back because I had a customer who was considering migrating from Oracle to RHEL but they were concerned about the amount of effort it would take to spin up new RHEL servers and migrate workloads. They were pleased to hear that it is possible to migrate in place using convert2rhel, and I threw together a quick demo for them which although not without it's hurdles was a lot easier to do "online" than it proved to be leveraging Satellite. Performing a RHEL conversion through the Satellite UI would mean that you could easily do batch migrations at scale, and open the door to doing conversions in disconnected environments.
Although convert2rhel officially supports Oracle Linux, our documentation is somewhat lacking when it comes to preparing Oracle specifically for conversion. Unlike the other officially supported distros (CentOS, Rocky and Alma) Oracle presents a few additional challenges, namely:
- Oracle Linux by default uses their UEK (Unbreakable Enterprise Kernel) and must be changed out for the RHCK (Red Hat Compatible Kernel)
- Oracle deprecated and ultimately removed
subscription-managerfrom their repos starting with Oracle Linux 7 - Oracle Linux contains some incompatible Intel Wifi firmware packages that must be removed
In order to make testing faster, I ended up creating custom VM templates in Openshift with all of the necessary changes applied to the base OS image, however this quickly became a series of chicken and egg problems where I needed to configure things in Satellite before I could then configure my Oracle Linux image.
After a lot of trial and error, and making (generally incorrect) assumptions about how the convert2rhel workflow should go on Satellite and how things should be configured I was finally successful in performing batch migrations of Oracle Linux to RHEL, using the Satellite UI in a reliably reproducible manner.
Preparing you Satellite server
For the sake of brevity, I'm going to assume you know your way around Satellite and it's basic functions, so I won't get too in the weeds. First, if you haven't already done so, you'll need to sync the Red Hat repos for the version you're working with - in my example I'm going to be working with RHEL 8.10, but the same concepts generally apply to RHEL 9. Then you're going to have to create several new products, content views and activation keys. At a minimum, you'll need to create products for Oracle Linux to include the BaseOS and AppStream repos.
Unlike most other distros, as far as I'm aware, there is only one official repo mirror for Oracle Linux located here:
https://yum.oracle.com/repo/OracleLinux/OL8
Be forewarned - the initial sync of the Oracle repos is going to take a very long time. It took over 8 hours on my Satellite server to pull down all the packages.

Subscription Manager For Oracle Linux 8
Then you're going to need to create a custom repo containing the subscription-manager package and its dependencies.
mkdir subscription-manager-8
cd subscription-manager-8
dnf download --resolve dnf-plugin-subscription-manager python3-cloud-what subscription-manager-rhsm-certificates python3-subscription-manager-rhsm subscription-manager python3-syspurpose
createrepo .
You will probably need to install createrepo_c first, as it is not generally included with a standard RHEL install.
Subscription Manager For Oracle Linux 9
mkdir subscription-manager-9
cd subscription-manager-9
dnf download --resolve libdnf-plugin-subscription-manager python3-cloud-what subscription-manager-rhsm-certificates python3-subscription-manager-rhsm subscription-manager
createrepo .
Once you have your repo structure created, you can drop it generally onto any web host (hint: you can just create a subdirectory under /var/www/html/pub/ on your Satellite server). I actually host mine in an nginx pod, but generally any web server will work.
Sample nginx.conf
user  nginx;
worker_processes  auto;
error_log  /var/log/nginx/error.log notice;
pid        /run/nginx.pid;
events {
    worker_connections  1024;
}
http {
    include       /etc/nginx/mime.types;
    default_type  application/octet-stream;
    log_format  main  '$remote_addr - $remote_user [$time_local] "$request" '
                      '$status $body_bytes_sent "$http_referer" '
                      '"$http_user_agent" "$http_x_forwarded_for"';
    access_log  /var/log/nginx/access.log  main;
    sendfile        on;
    #tcp_nopush     on;
    keepalive_timeout  65;
    #gzip  on;
    include /etc/nginx/conf.d/*.conf;
    server {
        listen       80 default_server;
        listen       [::]:80 default_server;
        server_name  _;
        root         /usr/share/nginx/html;
        # Load configuration files for the default server block.
        include /etc/nginx/default.d/*.conf;
        location / {
                allow all;
                sendfile on;
                sendfile_max_chunk 1m;
                autoindex on;
                autoindex_exact_size off;
                autoindex_format html;
                autoindex_localtime on;
        }
          error_page 404 /404.html;
            location = /40x.html {
        }
          error_page 500 502 503 504 /50x.html;
            location = /50x.html {
        }
    }
}
which is upped with a simple podman-compose.yml
version: '3.8'
services:
  nginx:
    image: nginx:latest
    ports:
      - "8880:80"
    volumes:
      - /pool0/podman/nginx/html:/usr/share/nginx/html
      - /pool0/podman/nginx/nginx.conf:/etc/nginx/nginx.conf
To make things easier on myself, I also added the .repo file in the repo making it easier to pull it down on my Oracle boxes, because although I also mirror this repo to a custom product on my Satellite server, you kinda need subscription-manager (the first 🐓:🥚 problem I encountered on this journey).
# example repo file
[subscription-manager]
name=Subscription Manager packages for Oracle
baseurl=https://zfs.cudanet.org/subscription-manager-8
enabled=1
gpgcheck=0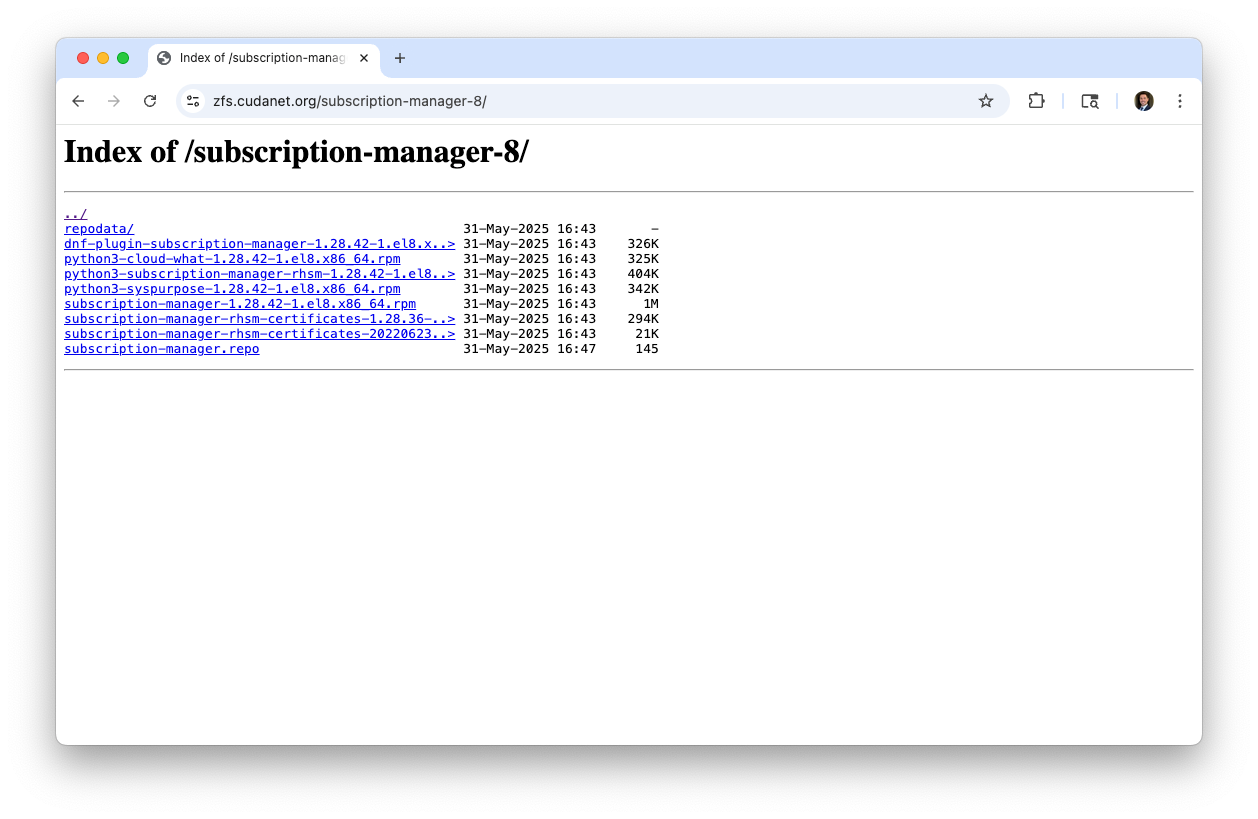
Convert2RHEL repo
No hackery or creating any custom repos here. You can either add the convert2rhel repo directly to your Oracle boxes, eg;
curl -o /etc/yum.repos.d/convert2rhel.repo https://cdn-public.redhat.com/content/public/repofiles/convert2rhel-for-rhel-9-x86_64.repo
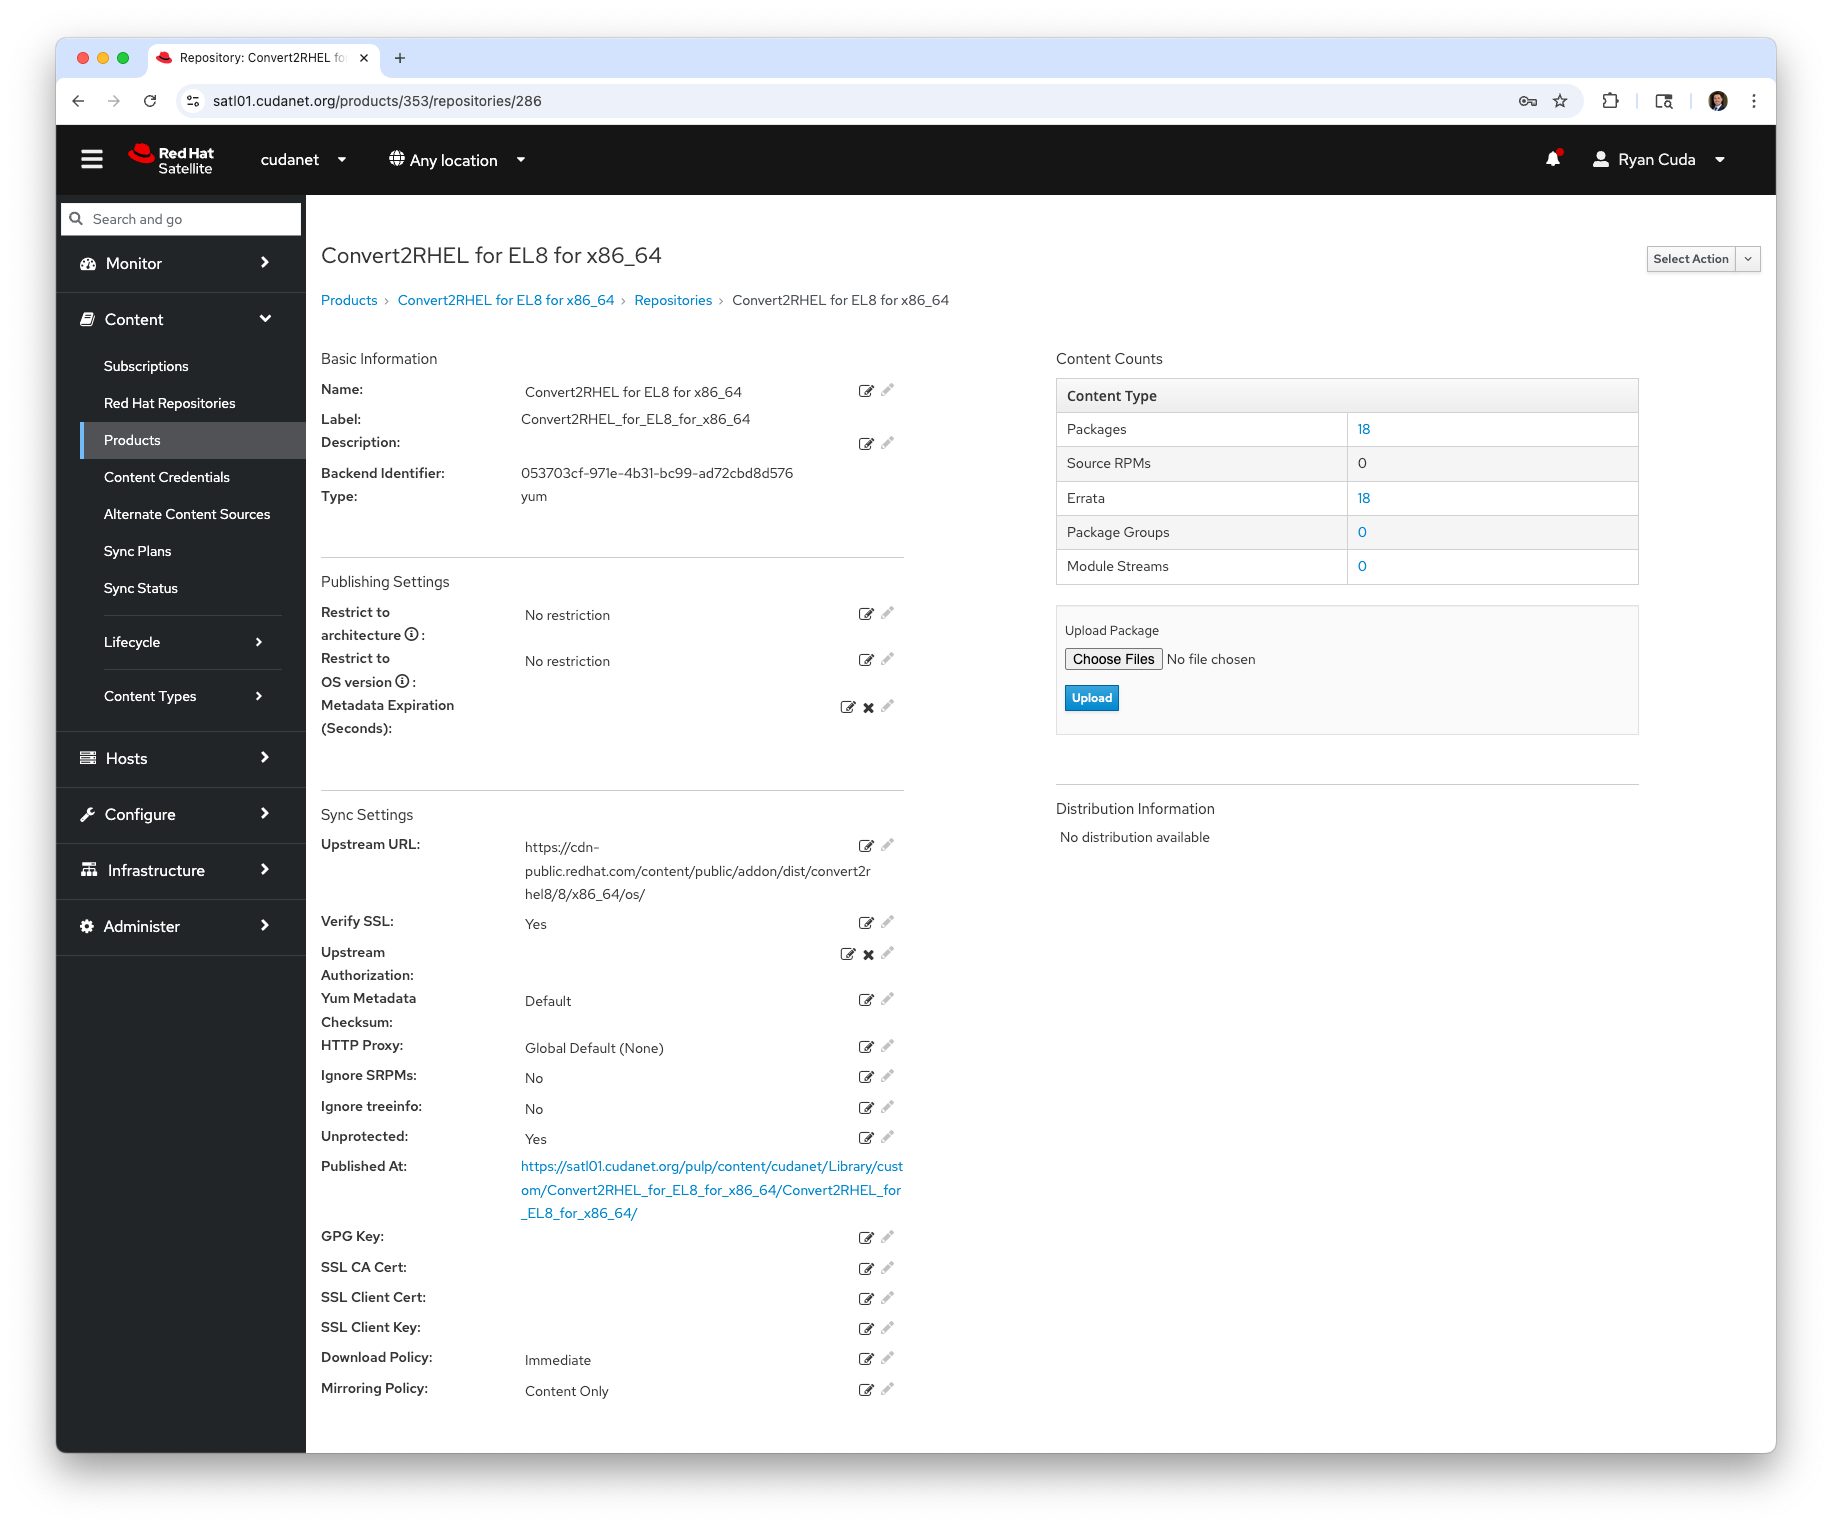
or, like me you can add it to your Satellite server. Just grab the URL from that repo file and create a new product + repo in Satellite
Preparing Oracle Linux for conversion
As I'd previously mentioned, there is a laundry list of tasks you have to perform on your Oracle Linux box before it is ready to be converted. First, we'll install subscription-manager since if this were a disconnected environment, that's where we'd have to begin in order to register the Oracle box to Satellite.
Download the repo file to /etc/yum.repos.d/ and install the package.
dnf -y install subscription-manager
Then you need to register your host. There are generally a few different ways to go about this. The old method was to first install your Satellite CA cert, update the system CA trust, then install the katello client package, eg;
curl -k https://satl01.cudanet.org/pub/katello-server-ca.crt > /etc/pki/ca-trust/source/anchors/katello-server-ca.crt
update-ca-trust
dnf -y install https://satl01.cudanet.org/pub/katello-ca-consumer-latest.noarch.rpm
There's a newer method in recent builds of Satellite that will do all of that in a one-liner under 'Register Host'. It's pretty slick, and can even configure REX (remote execution, aka; install the foreman-proxy service public SSH key for you). If you don't use the new method, make sure to run ssh-keygen -t rsa as root and add the foreman-proxy ssh key manually, eg;
ssh-keygen -t rsa
# follow the prompts, don't set a password
scp -r root@satl01:/var/lib/foreman-proxy/ssh/id_rsa_foreman_proxy.pub ./id_rsa_foreman_proxy.pub
cat ./id_rsa_foreman_proxy.pub >> ~/.ssh/authorized_keys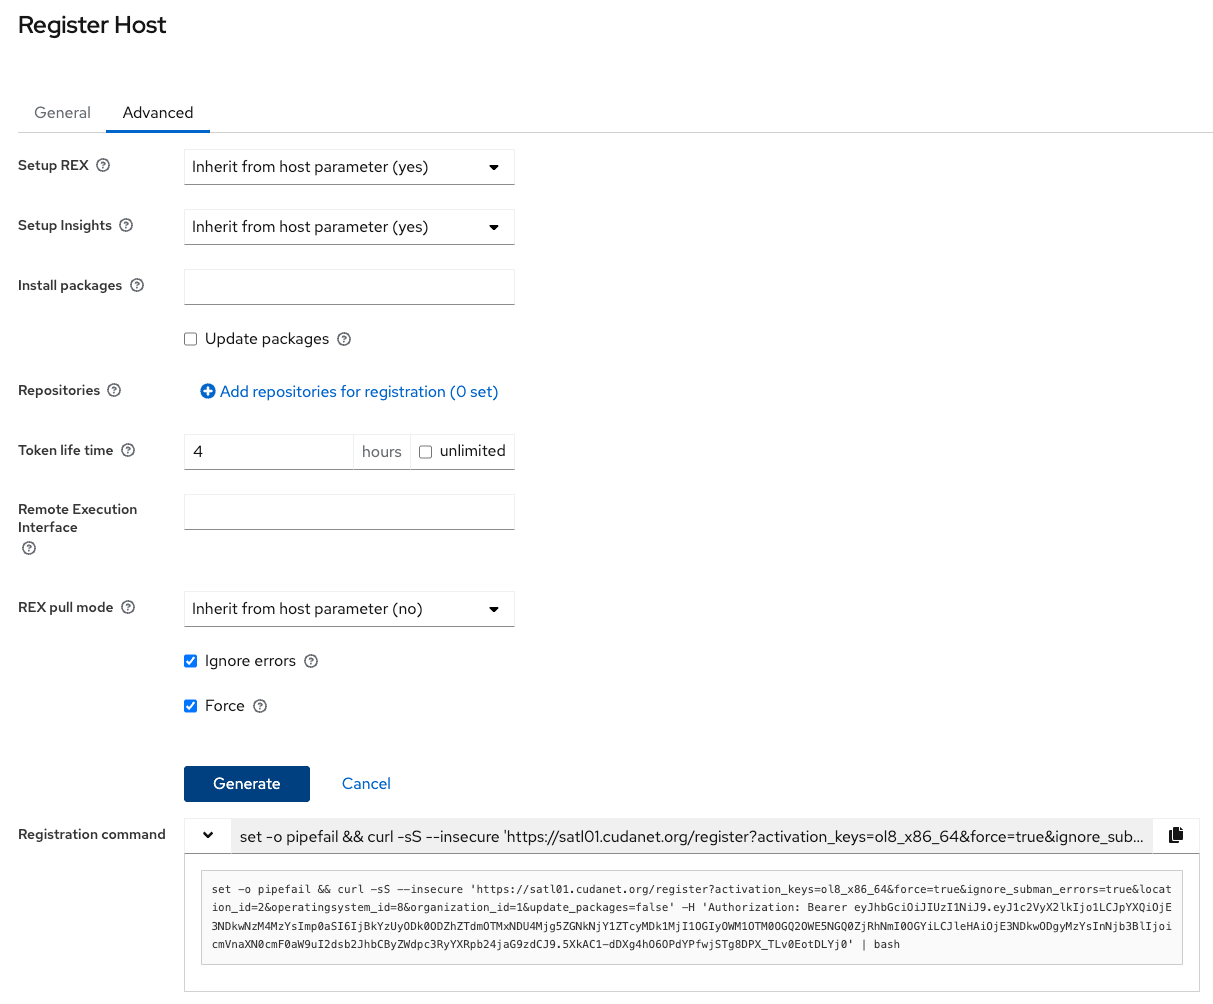
Then you can register your Oracle host to Satellite (assuming you've created a content view and an activation key for Oracle Linux. If you have not, do so now). We're going to have to create additional content views and activation keys later on, but for the purpose of preparing your Oracle host for convert2rhel, you need a content view with at a minimum, the Oracle BaseOS and AppStream repos, and the convert2rhel repo. Optionally you can include subscription-manager and get rid of the local repo file.
subscription-manager register --org=cudanet --activationkey=ol8_x86_64
You should now see your Oracle server in Satellite under hosts.
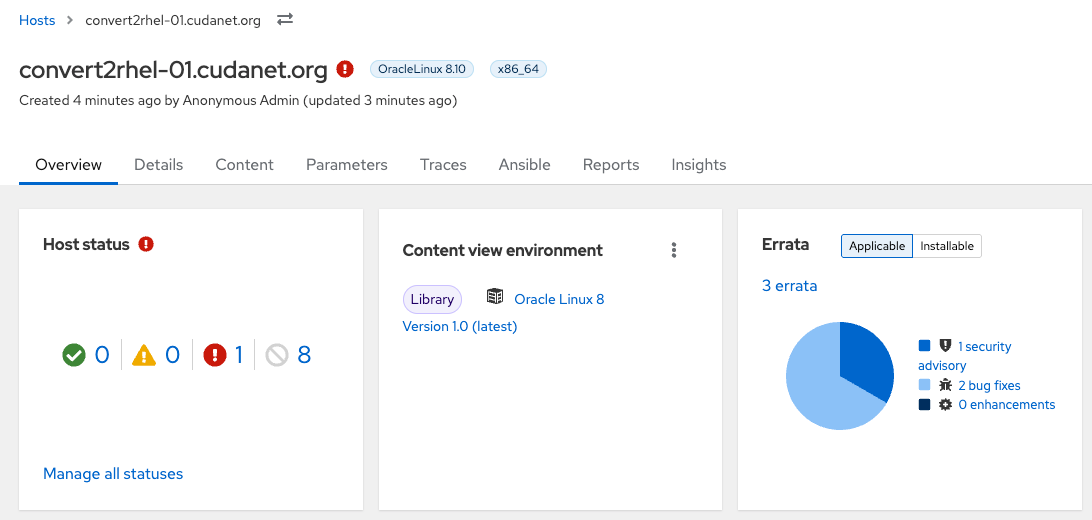
As we can see, it already has security errata that needs to be installed, so it's a good idea at this time to update your system.
dnf -y update
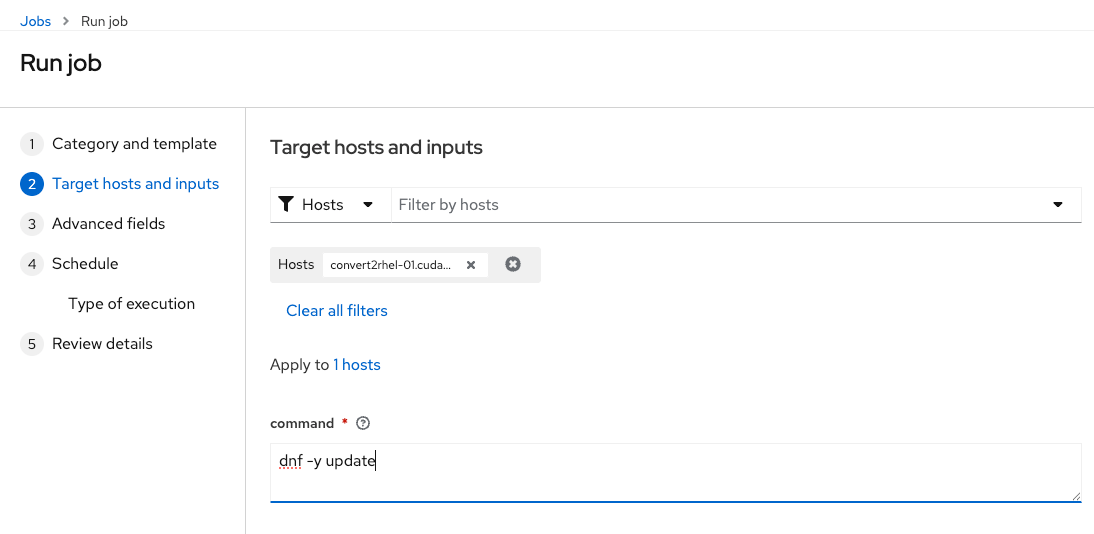
I'm lazy and like doing it through the Satellite UI. However, keep in mind that for any of the rest of this to work, you must have REX set up.
You could also do all of the above using Ansible, however that is not within the scope of this article.
Switch from booting UEK to RHCK
This step is pretty straightforward. You just modify your default boot option using grubby
# determine if you're using UEK, which is default for OL
grubby --default-kernel
uname -r
RHCK=$(grubby --info=ALL | grep ^kernel | grep -v uek | head -1 | awk -F '"' '{print $2}')
# set grub to boot RHCK, eg;
grubby --set-default $RHCK
reboot
# verify the system is booted into RHCK
uname -r
Remove conflicting packages
The Intel wireless firmware packages that ship with Oracle are incompatible with RHEL and must be removed
dnf -y remove iwl* Install Convert2rhel
we're going to install the convert2rhel package, but we aren't quite ready to run it yet.
dnf -y install convert2rhelAt this time, you probably want to unregister the VM from Satellite. We're going to have to create another content view that will be used specifically for convert2rhel
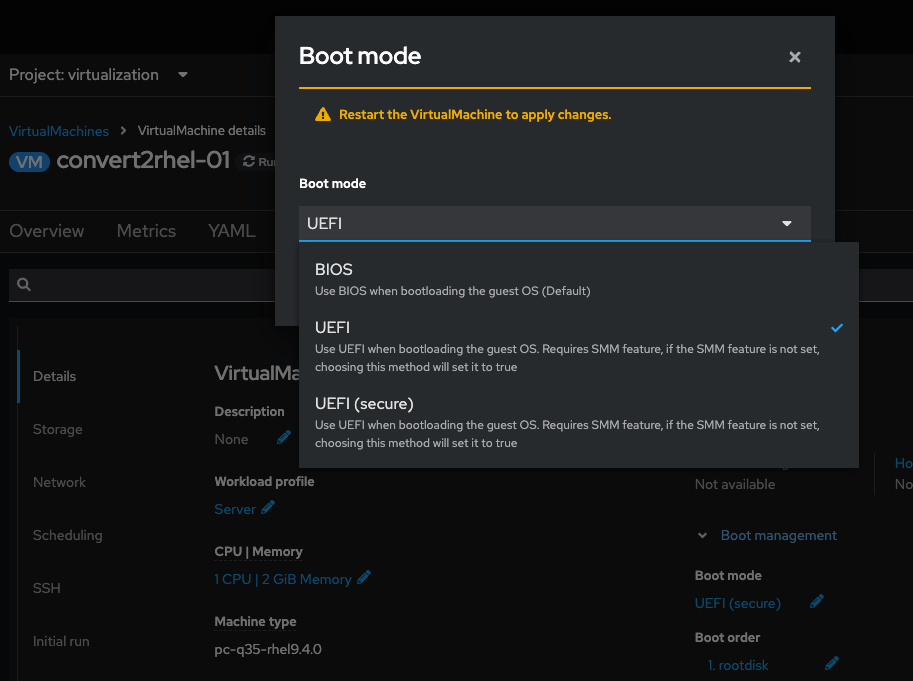
Disable Secure Boot
If you have secure boot enabled, you'll need to disable it during the conversion. You can of course turn it back on after your server has been converted.
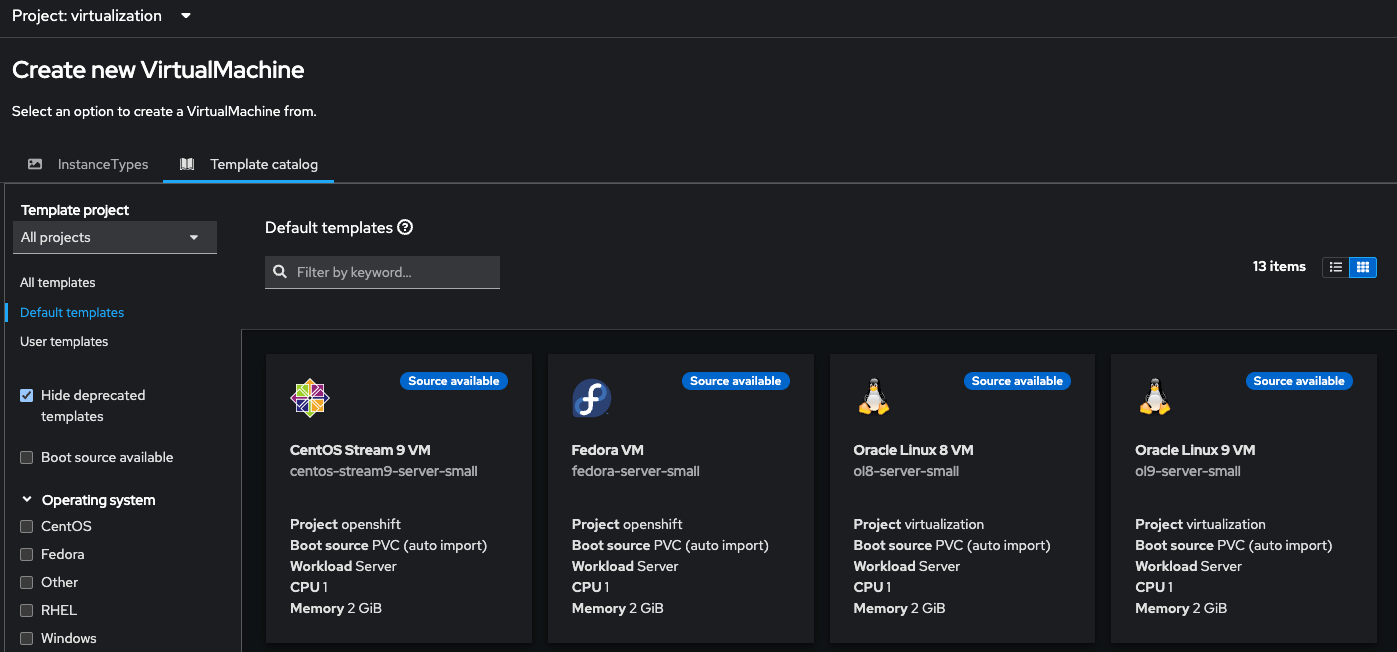
Optional: Create a template
Personally, I like easy and reproducible workflows. Depending on your virt platform the way to do this varies. Working with Openshift Virt, I find that the easiest way to create a template is to build it on a KVM host and then upload the disk image to Openshift, eg;
virtctl image-upload dv ol8 --size=64Gi --image-path=ol8-template.qcow2 --insecureFor whatever reason, after you've uploaded the disk image to a DataVolume, you'll also have to manually create a DataSource in order for the kubevirt template to actually see the disk as a boot source, eg;
apiVersion: cdi.kubevirt.io/v1beta1
kind: DataSource
metadata:
  annotations:
    operator-sdk/primary-resource: openshift-cnv/ssp-kubevirt-hyperconverged
    operator-sdk/primary-resource-type: SSP.ssp.kubevirt.io
  labels:
    app.kubernetes.io/component: storage
    app.kubernetes.io/managed-by: cdi-controller
    app.kubernetes.io/part-of: hyperconverged-cluster
    app.kubernetes.io/version: 4.18.2
    cdi.kubevirt.io/dataImportCron: centos-stream9-image-cron
    instancetype.kubevirt.io/default-instancetype: u1.medium
    instancetype.kubevirt.io/default-preference: ol8
    kubevirt.io/dynamic-credentials-support: "true"
  name: ol8
  namespace: virtualization
spec:
  source:
    pvc:
      name: ol8
      namespace: virtualization
Then you can create a custom VM template to use the image, eg;
kind: Template
apiVersion: template.openshift.io/v1
metadata:
  name: ol8-server-small
  namespace: virtualization
  labels:
    app.kubernetes.io/part-of: hyperconverged-cluster
    template.kubevirt.io/architecture: amd64
    flavor.template.kubevirt.io/small: 'true'
    template.kubevirt.io/version: v0.32.2
    app.kubernetes.io/version: 4.18.2
    template.kubevirt.io/type: base
    app.kubernetes.io/component: templating
    app.kubernetes.io/managed-by: ssp-operator
    os.template.kubevirt.io/ol8: 'true'
    template.kubevirt.io/default-os-variant: 'true'
    app.kubernetes.io/name: common-templates
    workload.template.kubevirt.io/server: 'true'
  annotations:
    template.kubevirt.io/provider: Oracle
    template.kubevirt.io/provider-url: 'https://www.oracle.com'
    template.kubevirt.io/containerdisks: |
      quay.io/containerdisks/centos-stream:8
    template.kubevirt.io/version: v1alpha1
    openshift.io/display-name: Oracle Linux 8 VM
    operator-sdk/primary-resource-type: SSP.ssp.kubevirt.io
    name.os.template.kubevirt.io/ol8: Oracle Linux 8 or higher
    defaults.template.kubevirt.io/disk: rootdisk
    template.kubevirt.io/editable: |
      /objects[0].spec.template.spec.domain.cpu.sockets
      /objects[0].spec.template.spec.domain.cpu.cores
      /objects[0].spec.template.spec.domain.cpu.threads
      /objects[0].spec.template.spec.domain.memory.guest
      /objects[0].spec.template.spec.domain.devices.disks
      /objects[0].spec.template.spec.volumes
      /objects[0].spec.template.spec.networks
    template.openshift.io/bindable: 'false'
    openshift.kubevirt.io/pronounceable-suffix-for-name-expression: 'true'
    operator-sdk/primary-resource: openshift-cnv/ssp-kubevirt-hyperconverged
    tags: 'hidden,kubevirt,virtualmachine,linux,centosstream'
    template.kubevirt.io/provider-support-level: Community
    description: Template for Oracle Linux 8 VM or newer. A PVC with the Oracle Linux disk image must be available.
    openshift.io/support-url: 'https://github.com/kubevirt/common-templates/issues'
    iconClass: icon-oracle
    openshift.io/provider-display-name: Oracle
objects:
  - apiVersion: kubevirt.io/v1
    kind: VirtualMachine
    metadata:
      annotations:
        vm.kubevirt.io/validations: |
          [
            {
              "name": "minimal-required-memory",
              "path": "jsonpath::.spec.domain.memory.guest",
              "rule": "integer",
              "message": "This VM requires more memory.",
              "min": 1610612736
            }
          ]
      labels:
        app: '${NAME}'
        kubevirt.io/dynamic-credentials-support: 'true'
        vm.kubevirt.io/template: ol8-server-small
        vm.kubevirt.io/template.revision: '1'
        vm.kubevirt.io/template.version: v0.32.2
      name: '${NAME}'
    spec:
      dataVolumeTemplates:
        - apiVersion: cdi.kubevirt.io/v1beta1
          kind: DataVolume
          metadata:
            name: '${NAME}'
          spec:
            sourceRef:
              kind: DataSource
              name: ol8
              namespace: virtualization
            storage:
              resources:
                requests:
                  storage: 70Gi
      runStrategy: Manual
      template:
        metadata:
          annotations:
            vm.kubevirt.io/flavor: small
            vm.kubevirt.io/os: ol8
            vm.kubevirt.io/workload: server
          labels:
            kubevirt.io/domain: '${NAME}'
            kubevirt.io/size: small
        spec:
          architecture: amd64
          domain:
            cpu:
              cores: 1
              sockets: 1
              threads: 1
            devices:
              disks:
                - disk:
                    bus: virtio
                  name: rootdisk
                - disk:
                    bus: virtio
                  name: cloudinitdisk
              interfaces:
                - bridge: {}
                  model: virtio
                  name: default
              rng: {}
            features:
              smm:
                enabled: true
            firmware:
              bootloader:
                efi: {}
            memory:
              guest: 2Gi
          networks:
            - multus:
                networkName: machine-net
              name: default
          terminationGracePeriodSeconds: 180
          volumes:
            - dataVolume:
                name: '${NAME}'
              name: rootdisk
            - cloudInitNoCloud:
                userData: |-
                  #cloud-config
                  user: <your-user>
                  password: <your-password>
                  chpasswd: { expire: False }
              name: cloudinitdisk
parameters:
  - name: NAME
    description: VM name
    generate: expression
    from: 'ol8-[a-z0-9]{16}'
  - name: DATA_SOURCE_NAME
    description: Name of the DataSource to clone
    value: ol8
  - name: DATA_SOURCE_NAMESPACE
    description: Namespace of the DataSource
    value: virtualization
  - name: CLOUD_USER_PASSWORD
    description: Randomized password for the cloud-init user centos
    generate: expression
    from: '[a-z0-9]{4}-[a-z0-9]{4}-[a-z0-9]{4}'
Configure Satellite for Convert2RHEL
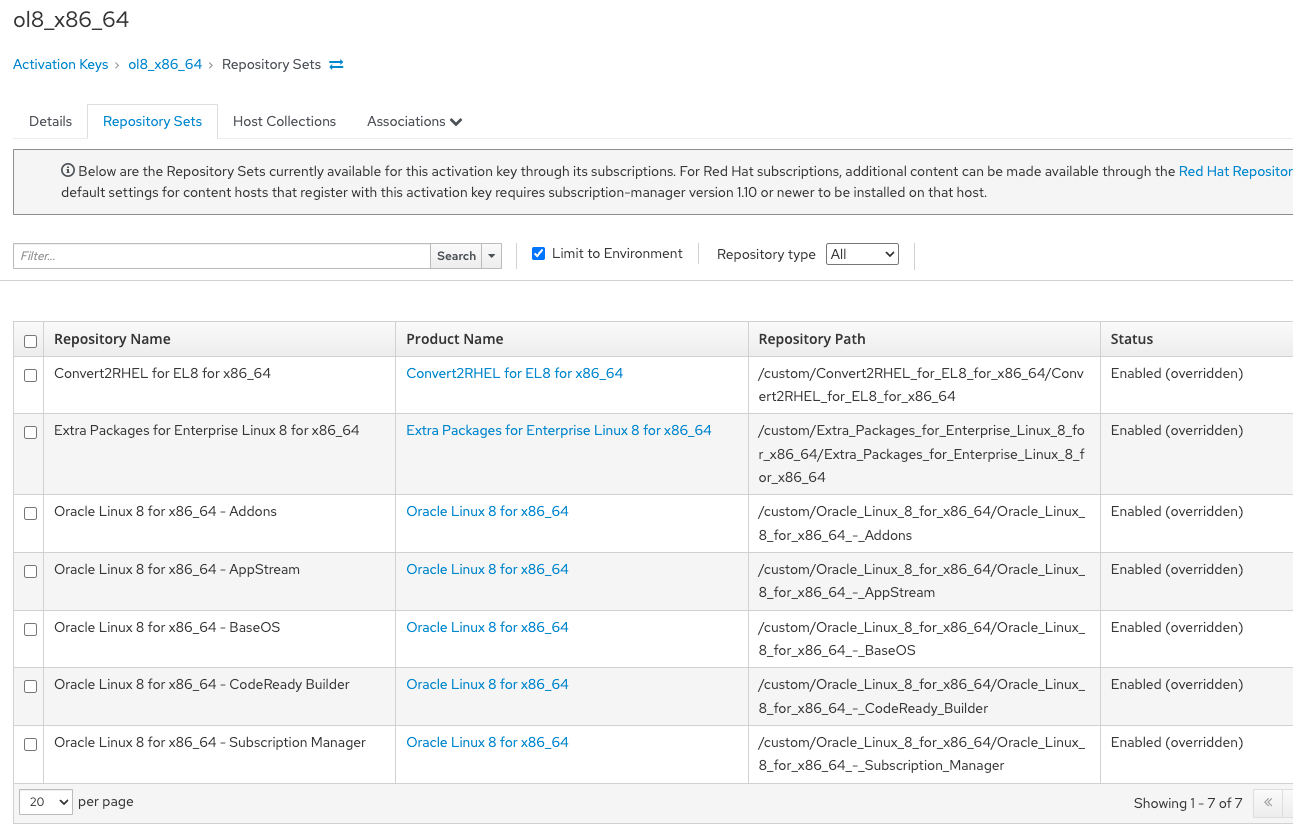
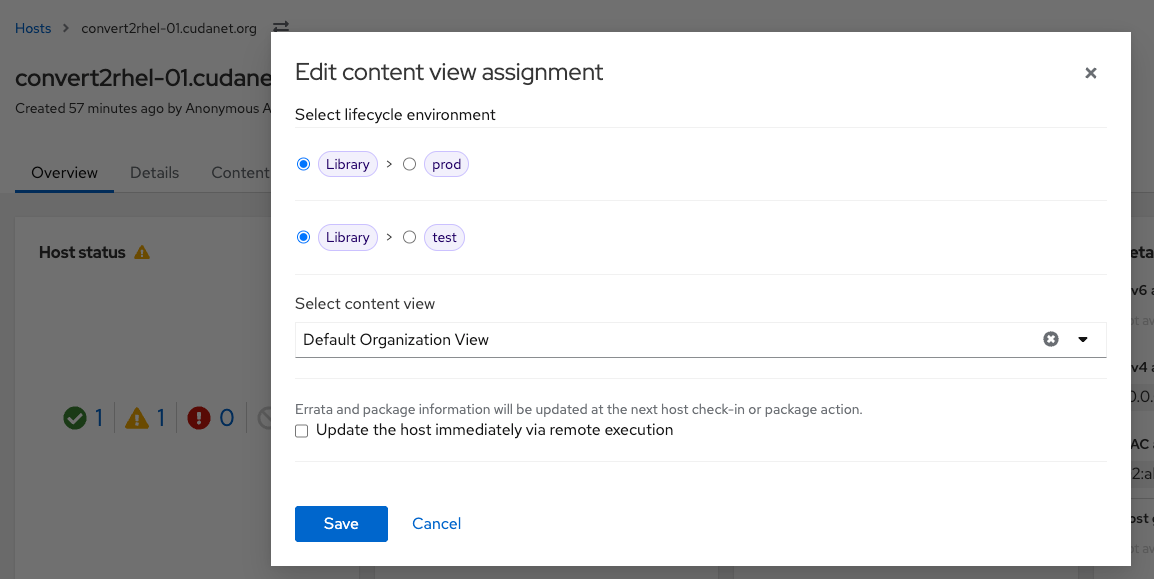
With our VM template ready, now we need to configure a few more things on Satellite. This was actually the part that stumped me for a long time because I was making incorrect assumptions about the convert2rhel process. For instance, I assumed that you needed a content view that explicitly includes the RHEL and Oracle repos, when in reality the only way I was ever able to get this to work was to not use a content view at all and just create an activation key that pointed to Library > Default Organization View which effectively contains everything in your Satellite. Just select the necessary repos from the list (RHEL 8 and Oracle Linux 8 in this case) and disable everything else.
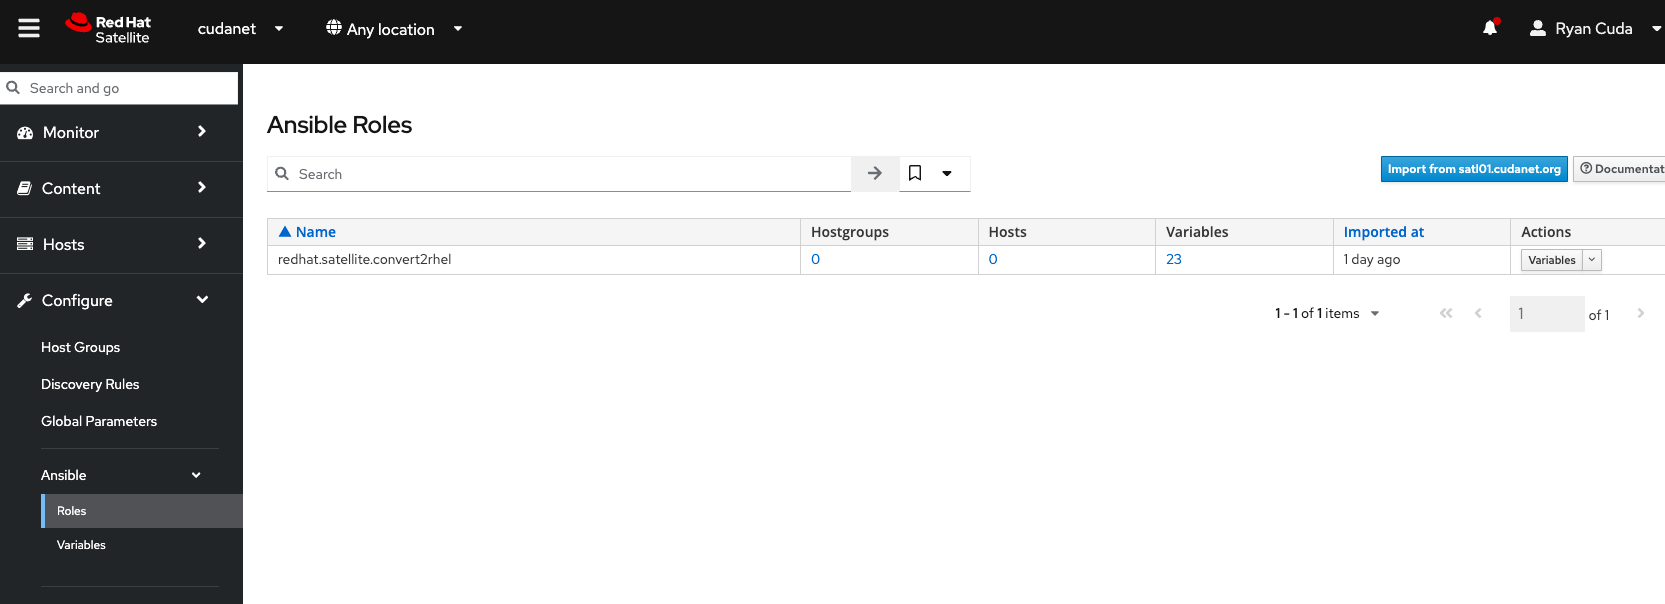
Install the Ansible Role on Satellite
Navigate to Configure > Ansible > Roles and click the 'Import from Satellite' button. Then select the redhat.satellite.convert2rhel from the list
Re-register your Oracle server
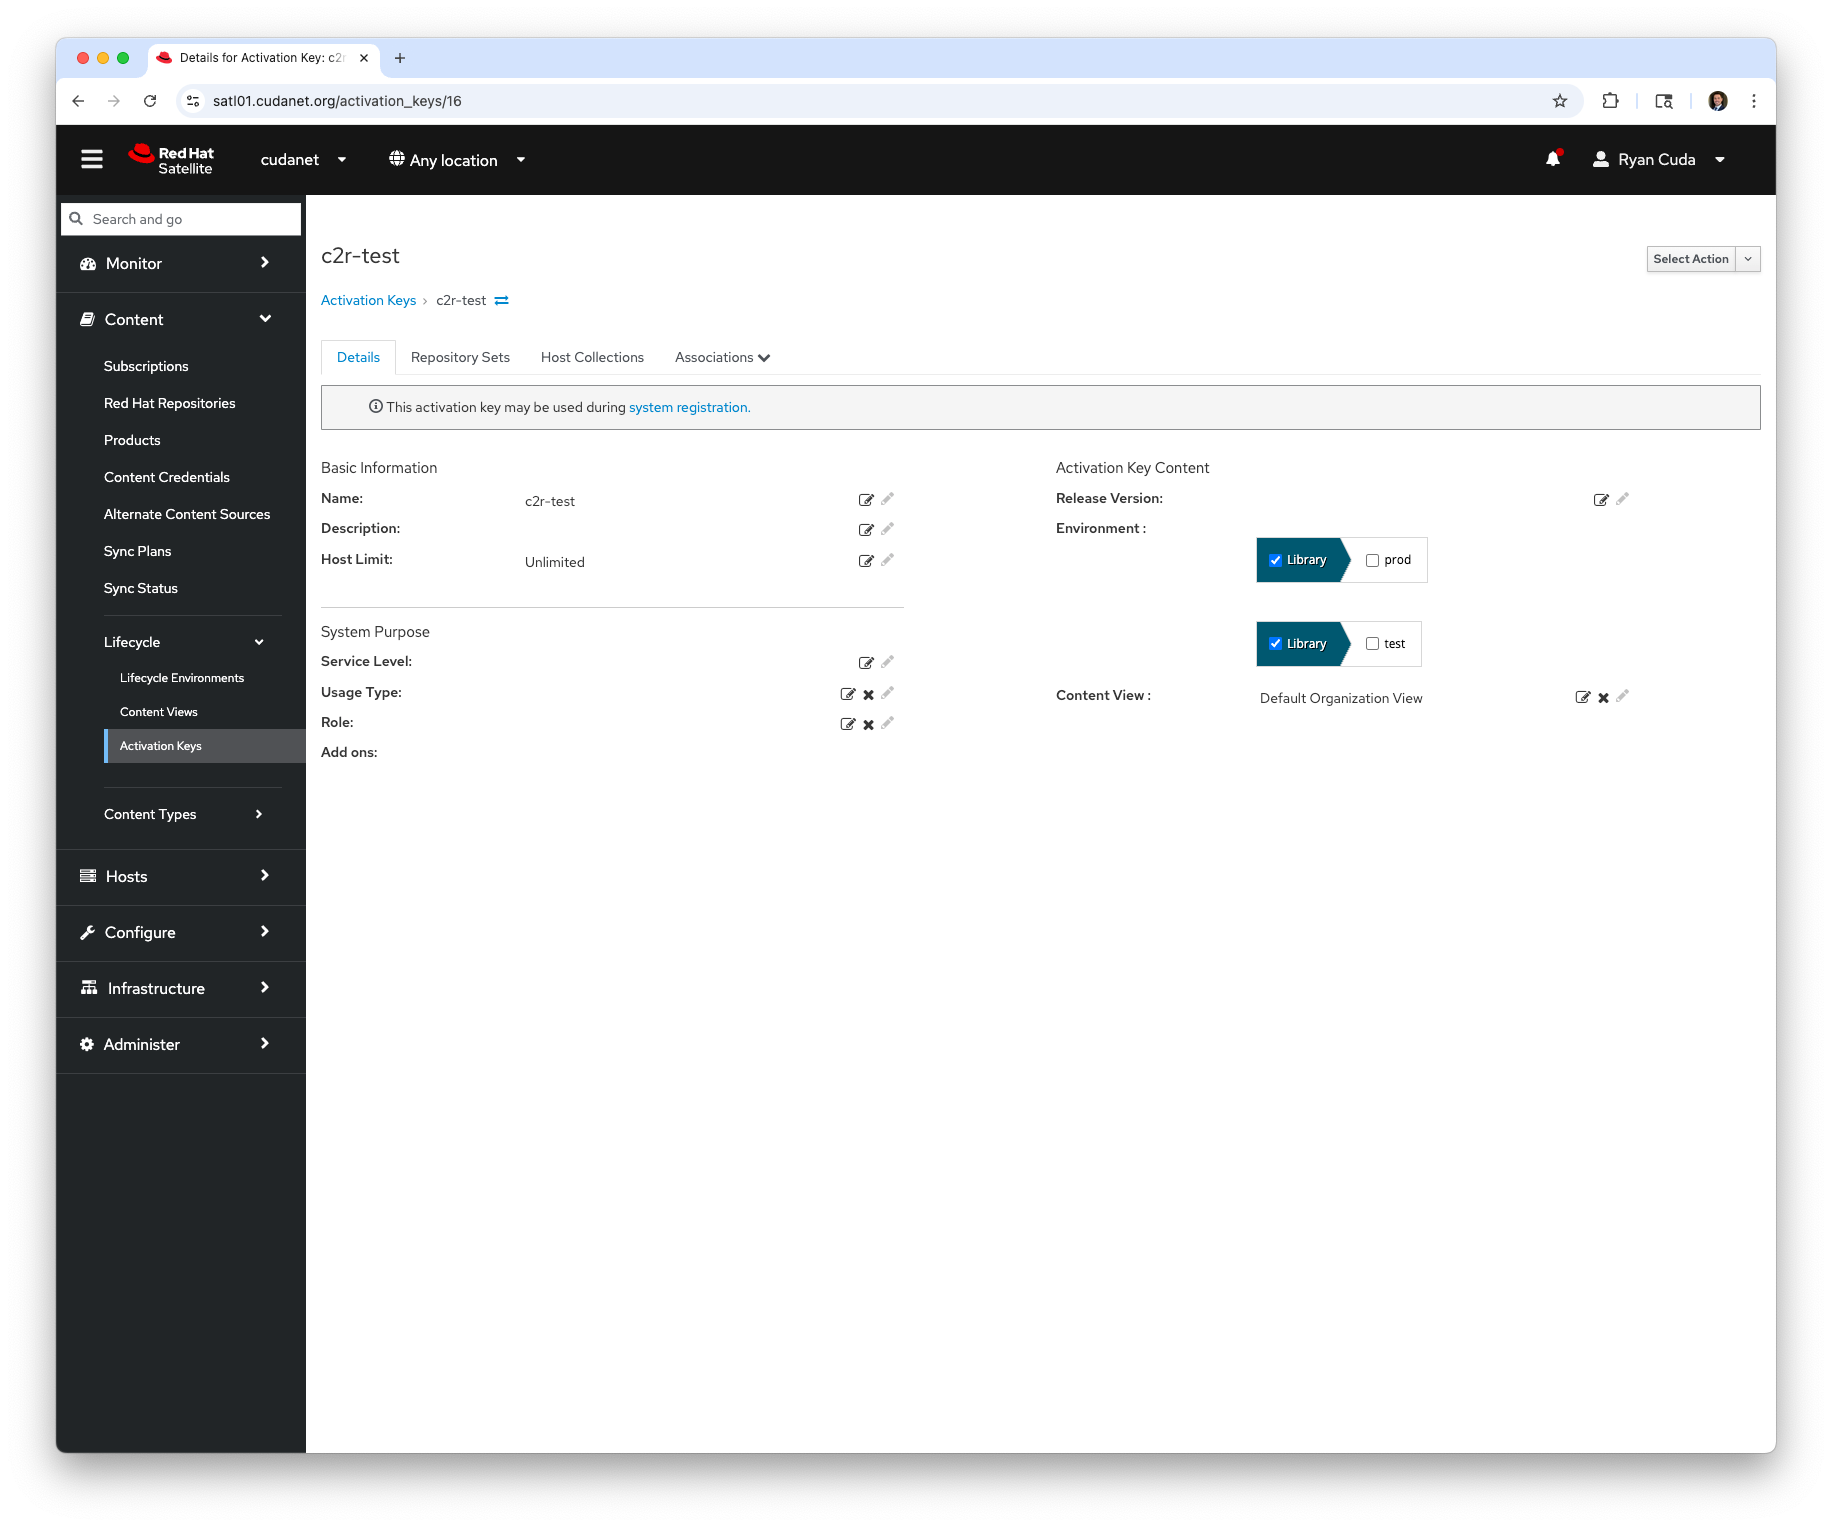
Re-register the Oracle server using the new activation key you created under Library > Default Organization View.
subscription-manager register --org=cudanet --activationkey=c2r-testThen with your host re-registered to Satellite, click on the host and click the 3 dot menu under Content View Environment. Make sure to select Library and Default Organization View. (I'm sure that this step could be automated somehow but this is what worked for me while going through this process).
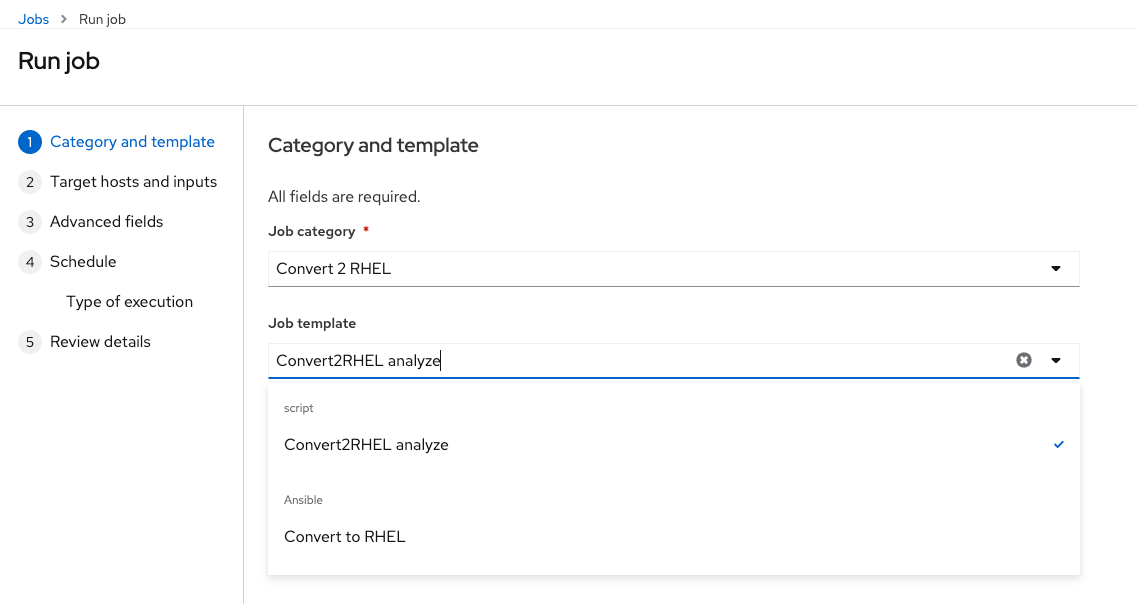
Run Convert2RHEL
At long last, we're finally ready to run convert2rhel. However, it's probably wise to run a Convert2RHEL Analyze job first as a sanity check.
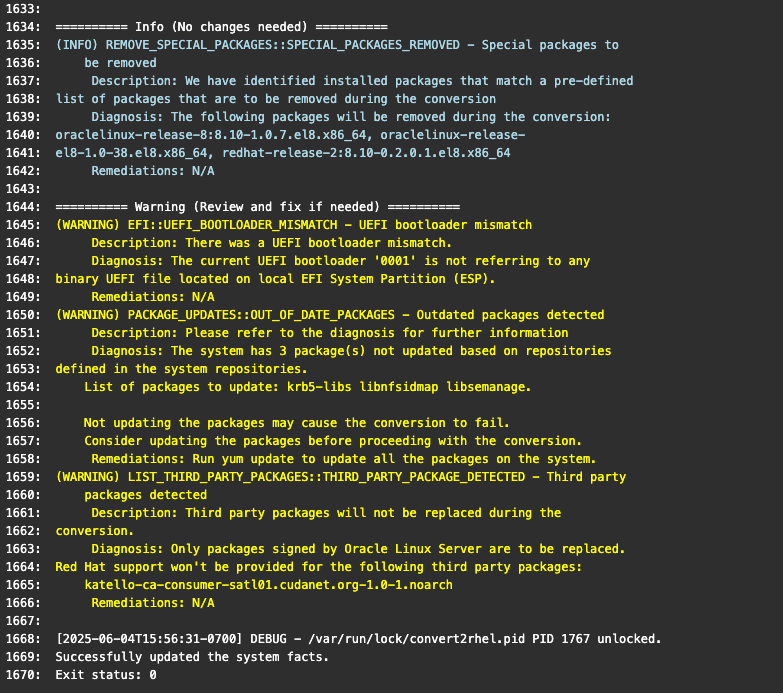
Assuming it passes all of it's checks, you can proceed to run the conversion.
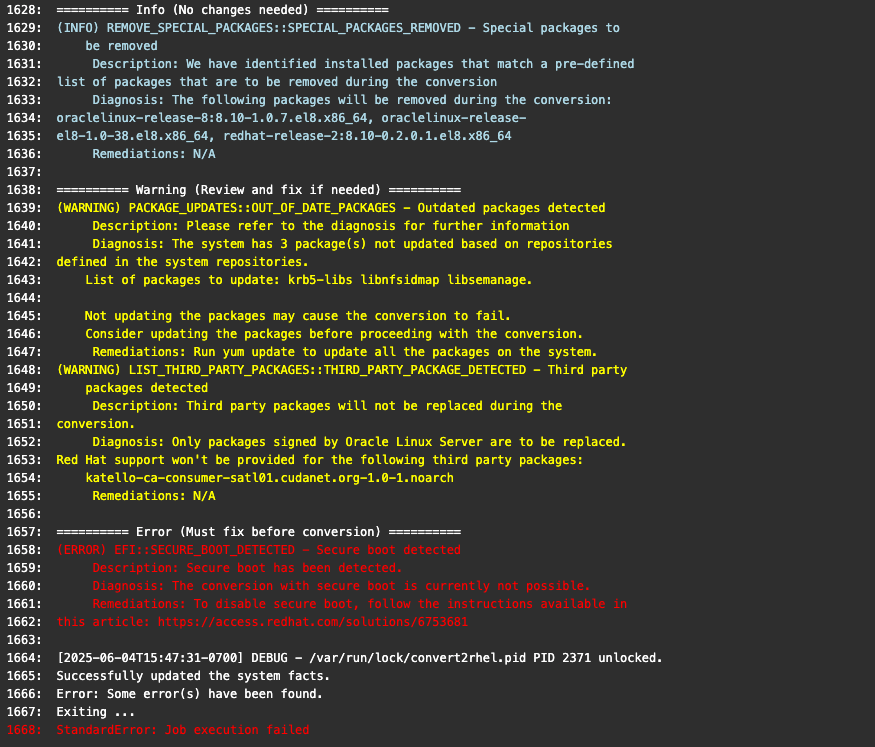
D'oh! Remember what I said about disabling secure boot temporarily? Yeah, VMs need a reboot for the setting to take. But other than that, everything checked out with no errors.
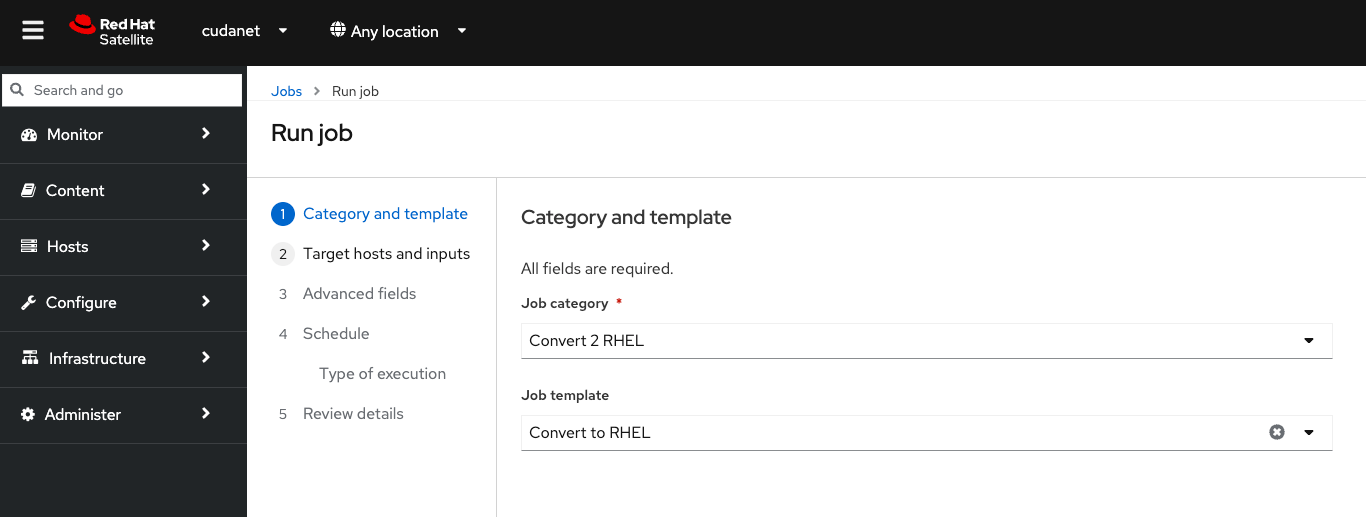
That's more like it. Now let's run the actual conversion. Schedule a new remote job on the host and select the actual Convert to RHEL job template this time.
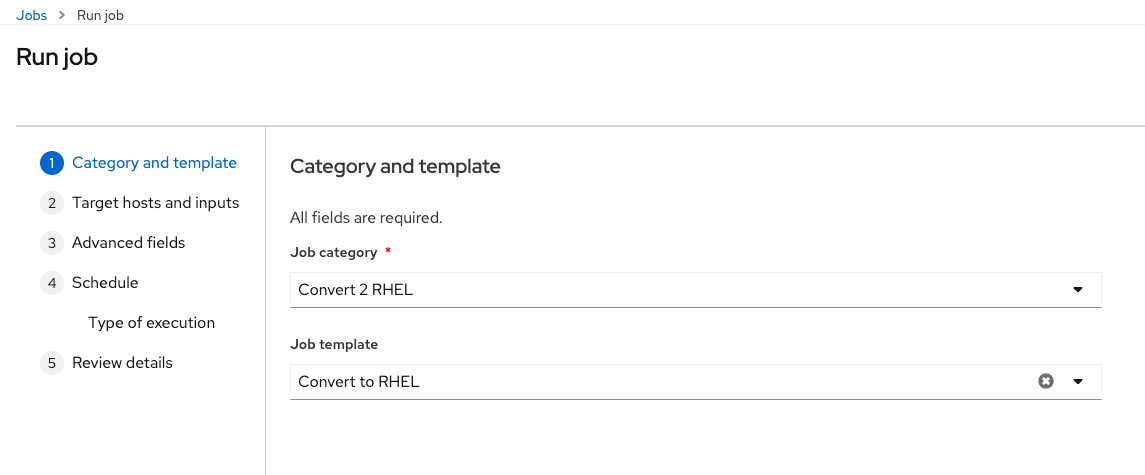
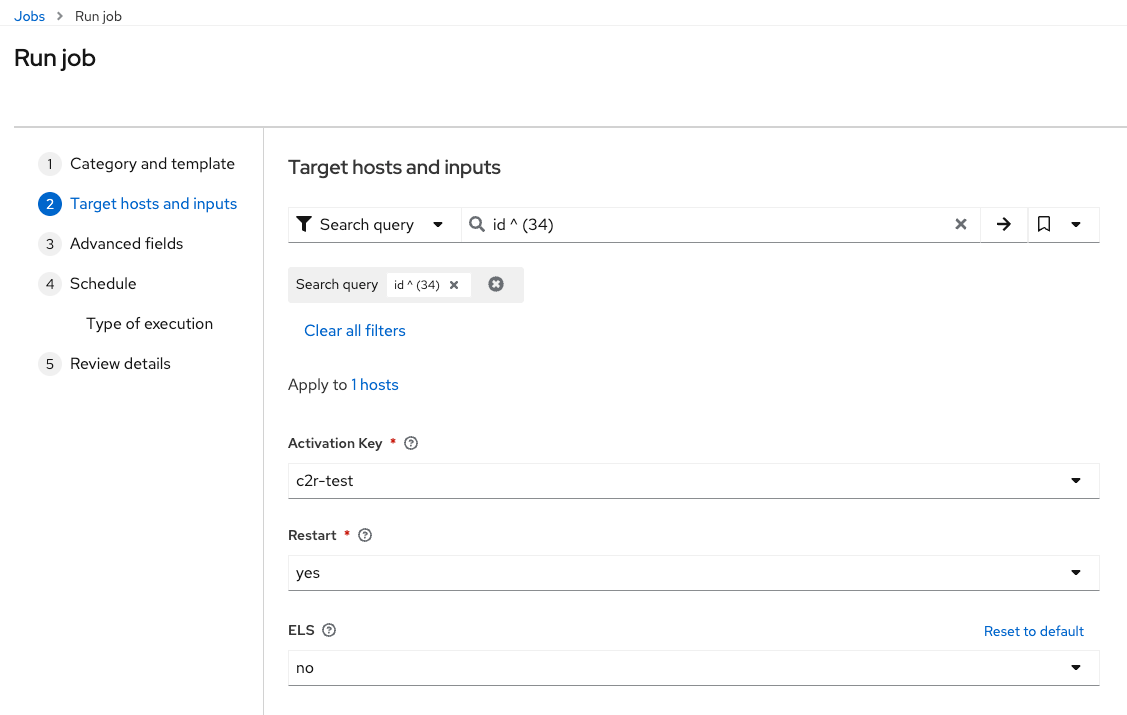
Select your activation key, select Restart = Yes and set ELS = No.
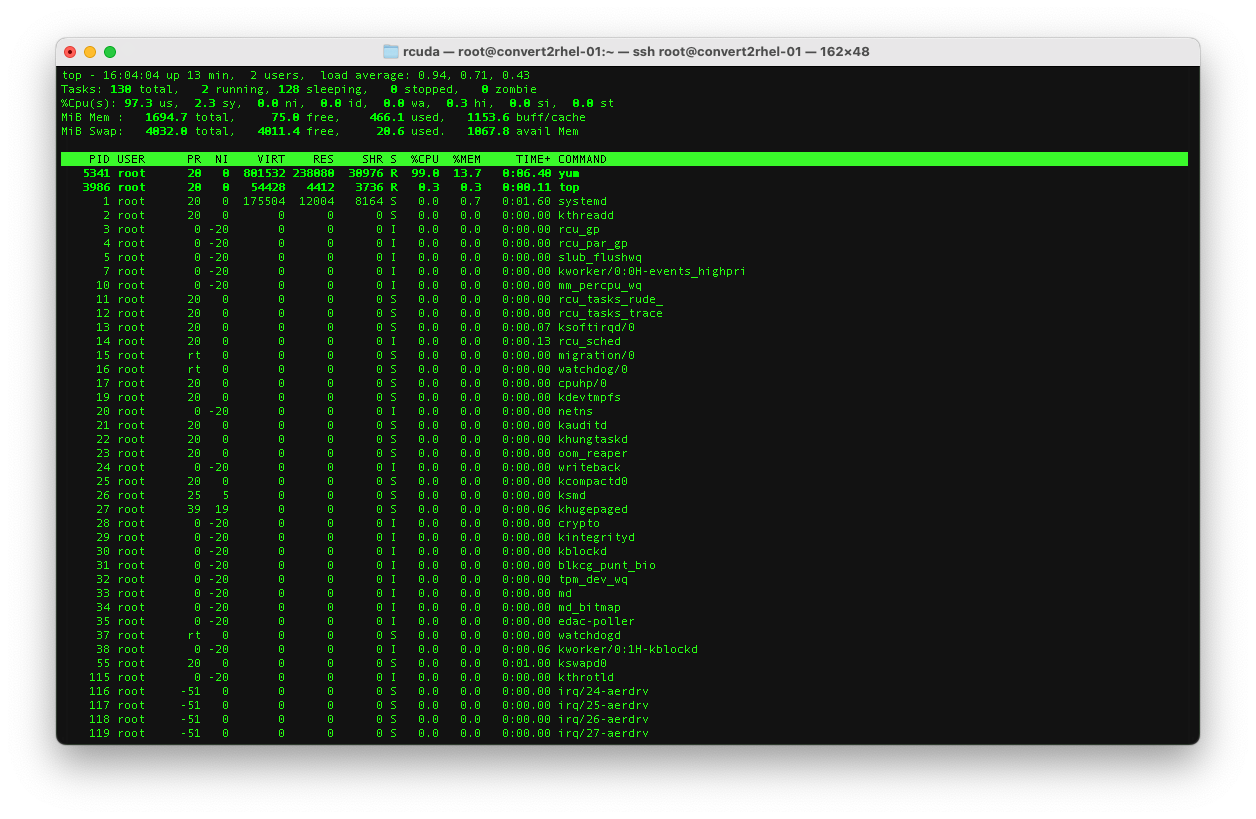
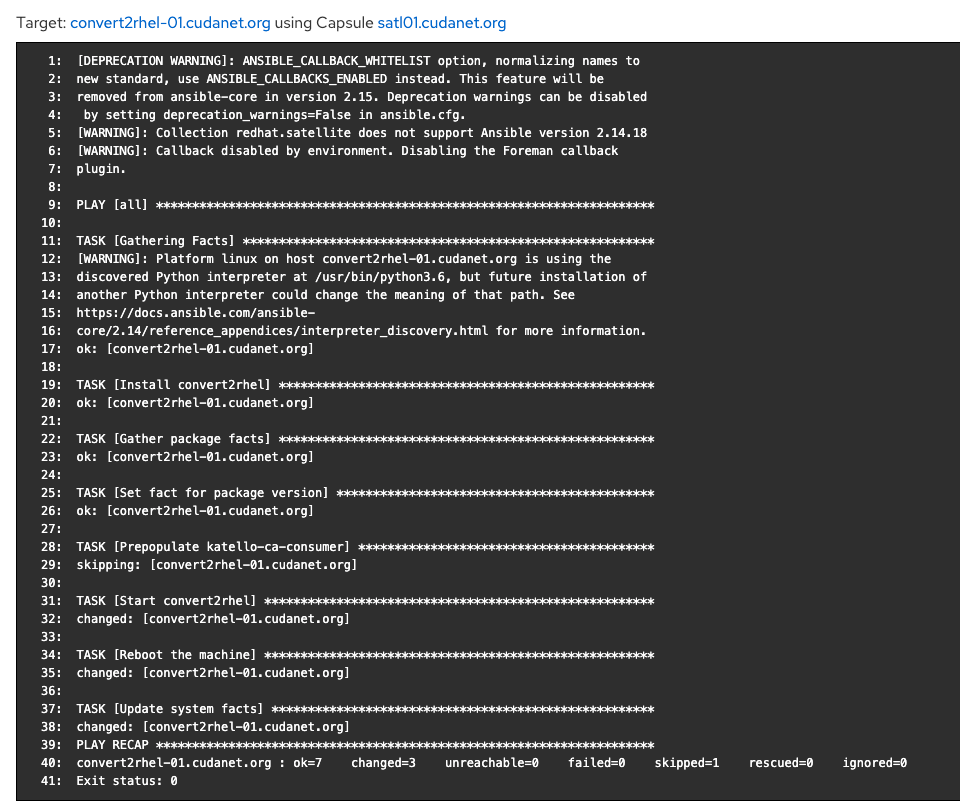
Then click 'Run on Selected Hosts' to kick of the job. The actual conversion takes a lot longer than the analyze job, and it's going to sit on TASK [Start convert2rhel] the majority of the time with no further information. You can ssh into the box and run top to see what it's actually doing.
It took about 18 minutes total for the conversion job to run and reboot the host. YMMV.
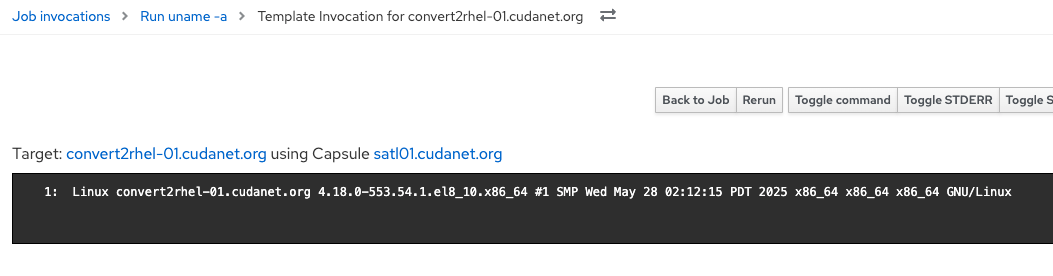
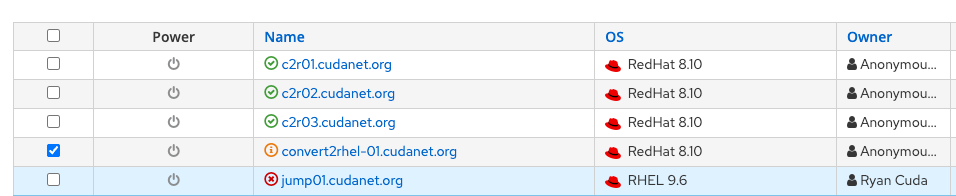
If we go back to the hosts list, we can now see that the OS is now reporting itself as RHEL 8
Make sure to re-register the server using a RHEL activation key, eg;
subscription-manager register --org=cudanet --activationkey=rhel_8_x86_64 --forceAlso - don't forget to remove the LEAPP packages from the system after the upgrade is completed.
rpm -e leapp-0.19.0-1.el8_10.noarch
rpm -e python3-leapp-0.19.0-1.el8_10.noarch
rpm -e leapp-deps-el9-5.0.9-100.202502140957Z.51872205.main.el9.noarch
Wrapping up
It was a long journey to get to the point where I could successfully convert an Oracle box to RHEL using only Satellite and more importantly, only Satellite hosted repos, thus making this process reproducible in disconnected environments. I probably made this harder on my self than necessary by stubbornly insisting on going with Oracle instead of one of the "easier" distros like CentOS
If you run into any snags along the way, it's probably best to run convert2rhel directly on the server CLI as it will provide a lot more debugging info until you get the process ironed out for your environment.
Now to tackle LEAPP 🤔. To be continued...