Attention on Deck!


All Aboard the Valve Train? Steam Locomotive?
There’s definitely a solid train pun in here somewhere, but dad jokes aside—I picked up a Steam Deck a few weeks ago, and I’m completely hooked. Honestly, I didn’t expect to like it this much. Scratch that—I didn’t even know what to expect.
I’ve always been a fairly casual gamer. I’ve never really gotten into PC gaming for two big reasons:
A. I’m a die-hard Mac user, and
B. I’ve never enjoyed mouse-and-keyboard gaming or isolating myself in a separate room just to play.
I don’t console game much either (despite owning several), mainly because I don’t like hogging the TV. As a result, my gaming habits lately have been sporadic at best.
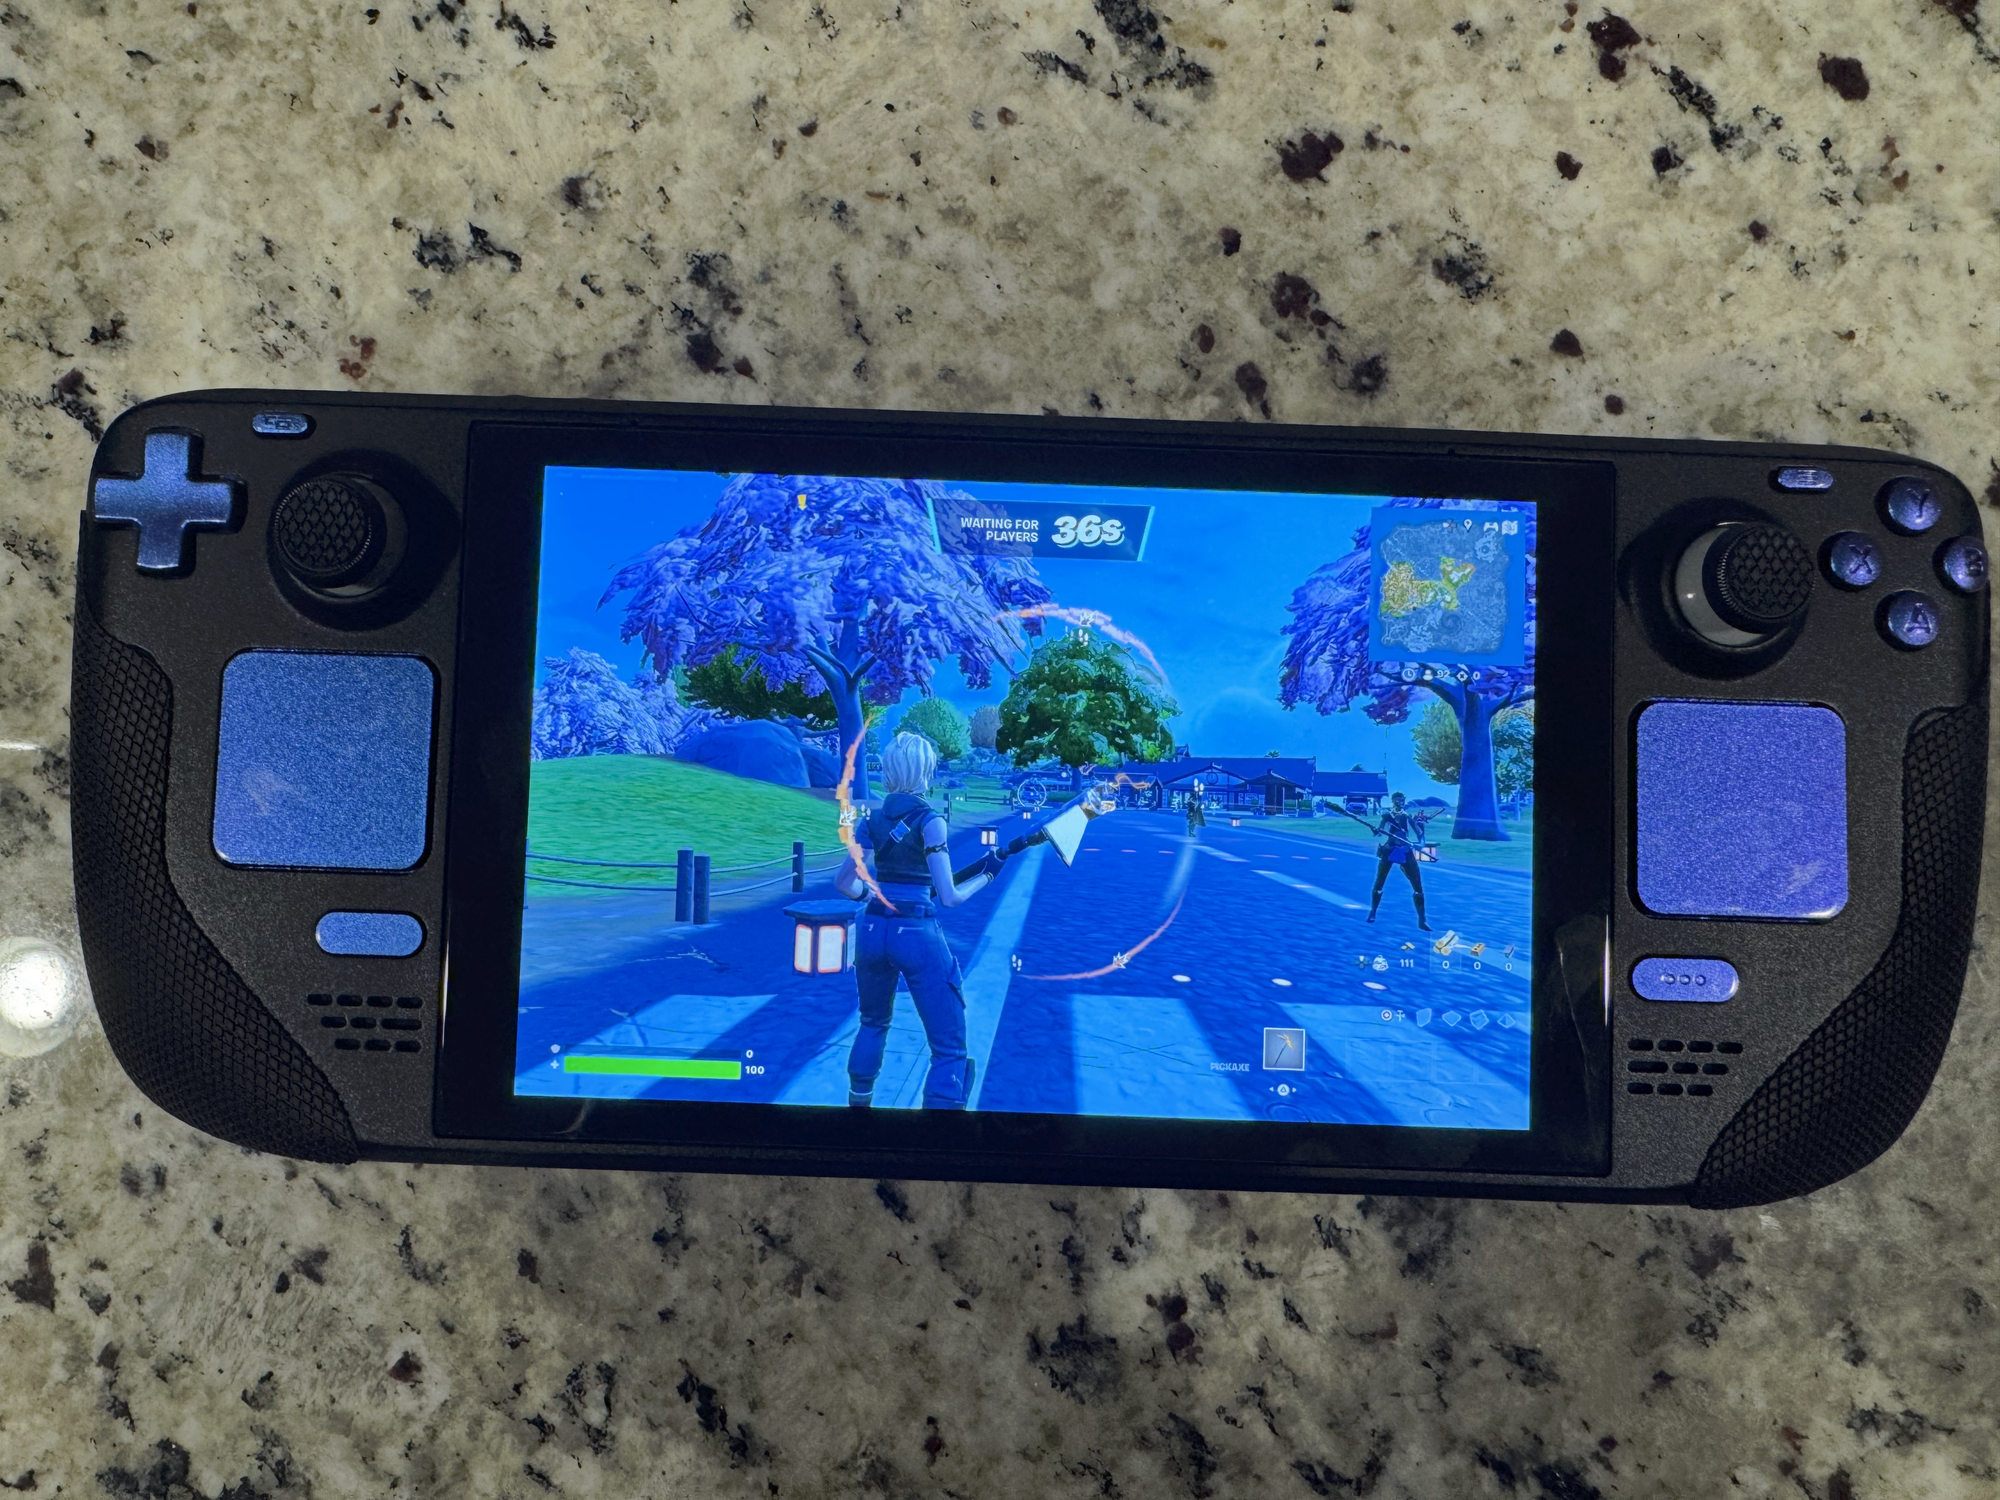
The Steam Deck, in that sense, is a total game changer (pun... maybe a little intended). I can now carry my entire library in one portable device, and I don’t have to be antisocial to use it. I can pick it up for 10 minutes or dive in for two hours—and thanks to the sleep/wake feature, I never even have to worry about saving or pausing. I just pick up right where I left off.
It’s technically a PC, sure. But as a handheld, it feels less like a scaled-down laptop and more like a shockingly capable console that punches well above its weight class. It’s the device I didn’t know I wanted—and now I can’t imagine not having it.
Funny enough, I originally bought the Steam Deck on a whim while shopping for my stepson’s upcoming 13th birthday. We had just gotten back from visiting family in the Midwest, and he insisted on bringing all his gaming gear to play with his cousins instead of, you know, “touching grass.”
Back at home in Phoenix, Arizona, “touching grass” isn’t exactly an option—at least not in July. Unless you’re submerged in a pool, going outside is basically punishment. Still, he’s your typical screen-addicted Gen A kid, and that's not a hill I'm willing to die on.
What did give me pause was the fact that we had to check an extra bag just for his gaming setup. That’s when it hit me—he could easily consolidate everything (his gaming laptop, Switch, and his – or rather my – Xbox) into one device.
handheld gaming has entered the chat
I initially leaned toward the Steam Deck for him too, but quickly ran into a wall. His top three games, Fortnite, Roblox, and Minecraft, don’t run natively on SteamOS. So I pivoted and picked up the ASUS ROG Ally instead. And honestly, I think that was the right call.
The goal was to get him something that “just works”—a plug-and-play device that wouldn’t require constant tech support from me. For that, the Ally checks every box. Windows on a handheld isn’t perfect, but if your kid’s games rely on anti-cheat (like Fortnite), it’s your best option. It’s not great... but it’s functional. And sometimes, that’s enough.
I’m actually looking forward to Microsoft’s upcoming Xbox Fullscreen Experience for Handhelds (yeah, terrible name) set to roll out later this year starting with the new ROG Xbox Ally. The new "experience" will likely be locked to officially supported devices only, which may leave the Steam Deck out in the cold—but let’s be honest: even if Microsoft do lock it to specific handhelds, some intrepid hacker will eventually port it to other devices. I can imagine even desktop gamers wanting a stripped down, console like experience for gaming on their rigs.
As for me? The Steam Deck is a tinkerer’s dream. Where the Ally feels like a more polished product, the Deck is a wide-open platform, both in terms of software and hardware.
Getting Fortnite to run on a Steam Deck requires some serious gymnastics, starting with installing Windows. And while it’s “just a PC,” dual-booting Windows while preserving SteamOS (which I absolutely want to do for most of my gaming) adds extra complexity. But for someone like me, that’s part of the fun.
In my opinion, the ROG Ally is technically the better device: better screen, faster processor, more RAM, and it just feels more "premium". However, the Steam Deck wins in terms of freedom, flexibility, and sheer potential, at least for now. If Valve ever gets SteamOS fully supported on the Ally, I might change my tune (yes, you can technically install SteamOS on the Ally but there are still a lot of things that don't work 100% correctly... kind of like installing Windows on a Steam Deck).
Until then, if you’re even a little bit technical—and you don’t mind getting your hands dirty—the Steam Deck is nothing short of amazing.
Dual Boot your Steam Deck
There are a few ways to dual boot a Steam Deck, and at the end of the day, it's really just a regular PC—so the usual rules apply. It’s an x86 machine with a solid AMD APU that punches well above its weight. The integrated GPU is comparable to an Nvidia GTX 1650 Ti or an RX 570, but built on a much newer architecture. Not bad at all for a handheld device. It can run just about anything short of the latest AAA games at max settings.
SteamOS, with all its Proton magic, actually runs many PC games better than Windows does. I might be a little biased (okay, alot biased—I work for the Linux company: Red Hat), but the performance results speak for themselves. For a lot of games, SteamOS just wins. That’s a pretty big deal, considering Microsoft has dominated the PC gaming space for decades.
That said, SteamOS isn’t perfect. While Steam boasts one of the largest game libraries out there, certain titles still won’t run; mostly games that require in kernel anti-cheat, like Fortnite, Call of Duty, and Destiny 2. If you want to play those on your Deck, you’ll need to install Windows.
Luckily, Valve anticipated this and has done a great job releasing drivers for all the key hardware components, making Windows on the Steam Deck a reality. There are two main ways to dual boot: install Windows on the internal SSD, or run it from a microSD card. Each has its trade-offs.
Installing to a microSD card is easier and doesn’t require messing with your main drive, but performance takes a hit—especially in terms of I/O speed—and SD cards aren’t built for sustained write activity. You’ll likely burn one out pretty fast. Installing Windows to the internal SSD offers much better performance, but it’s a bit trickier: you’ll need to shrink the SteamOS partition and deal with a few extra bootloader headaches.
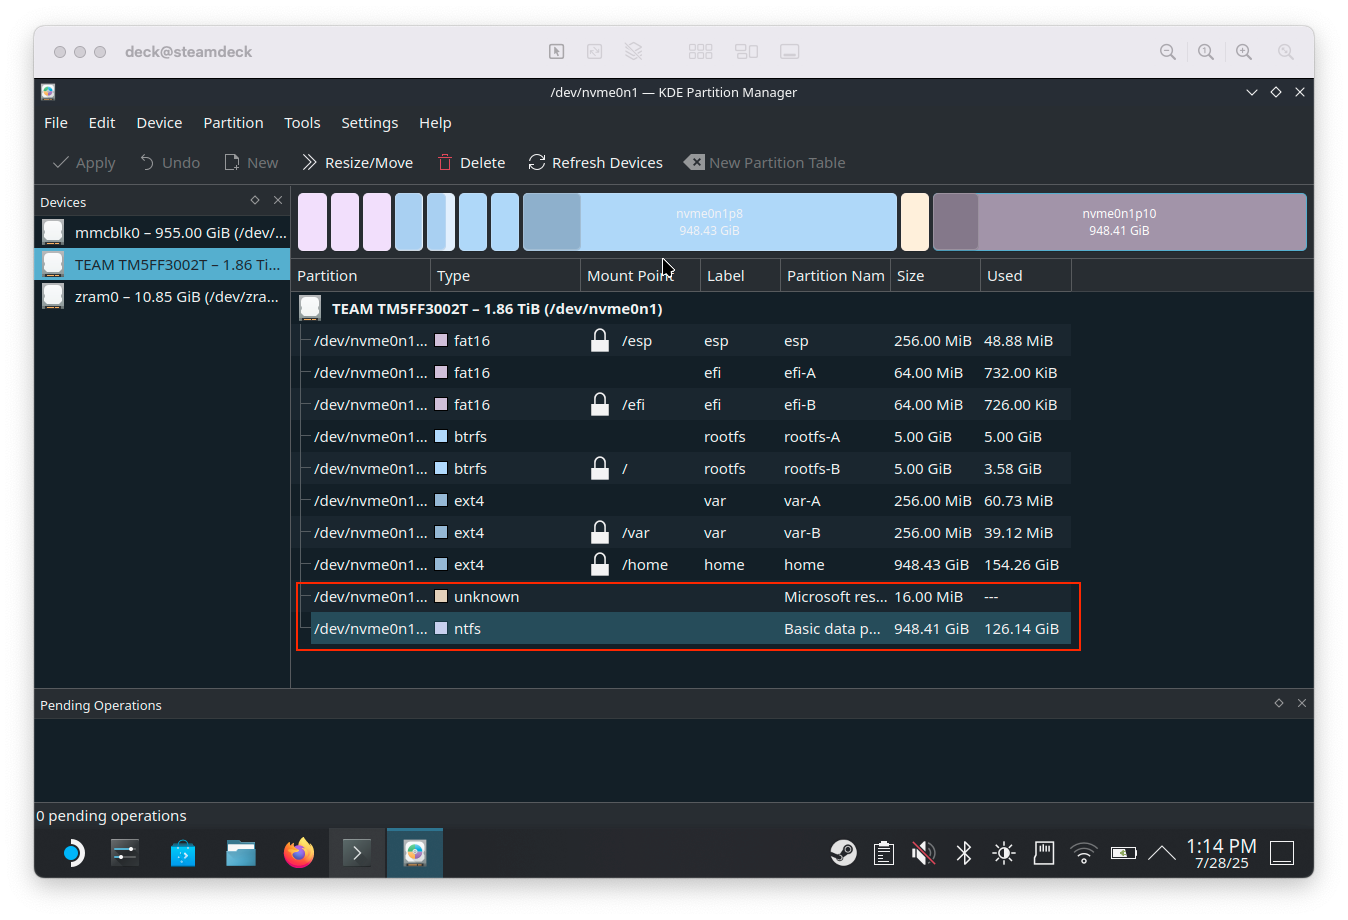
Step 1. Partition your SSD
Before installing Windows on your Steam Deck, you'll need to free up some space. Fortunately, SteamOS doesn't add any hidden partitions after the main storage partition (/home), so you can simply shrink it to make room. However, since you can't resize a mounted partition, you'll need to use a third party tool to do so.
There are several tools you can use for this, like GParted. Personally, I use the SteamOS Recovery Image, which comes with the necessary tools built-in, like fdisk and kdisk.
What You’ll Need:
- A USB-C dock
- A mouse and keyboard
When allocating space for Windows, I'd recommend at least 100GB, though that won’t leave much room for games. For example, installing Fortnite took up a massive 80GB on its own. I’m using a 2TB SSD and split it evenly: 1TB for SteamOS and 1TB for Windows.
Before launching the Windows installer, create a new FAT32 partition for it. In my experience, the installer sometimes won’t detect unallocated space unless a partition already exists—even though you’ll delete and reformat it during the installation.
Step 2. Update SteamOS
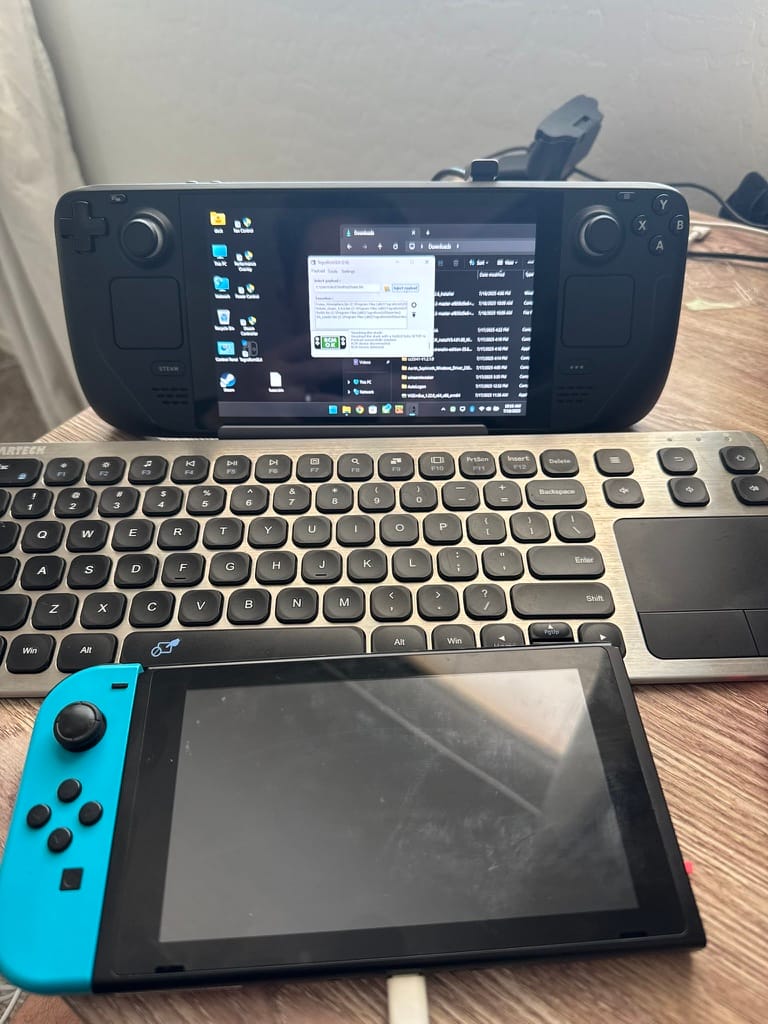
At its core, the Steam Deck is essentially a touchscreen laptop without a keyboard, which makes installing Windows a fairly straightforward process. Before you begin, though, make sure your Steam Deck’s BIOS firmware is up to date. To check, press the Steam button, go to Settings > System, and select Check for Updates.
For what it’s worth, I opted into the Beta update channel, which resolved a few game launch issues I was experiencing. I wouldn’t necessarily recommend the Preview channel unless you’re comfortable dealing with the occasional crash or system instability in exchange for early access to new features.
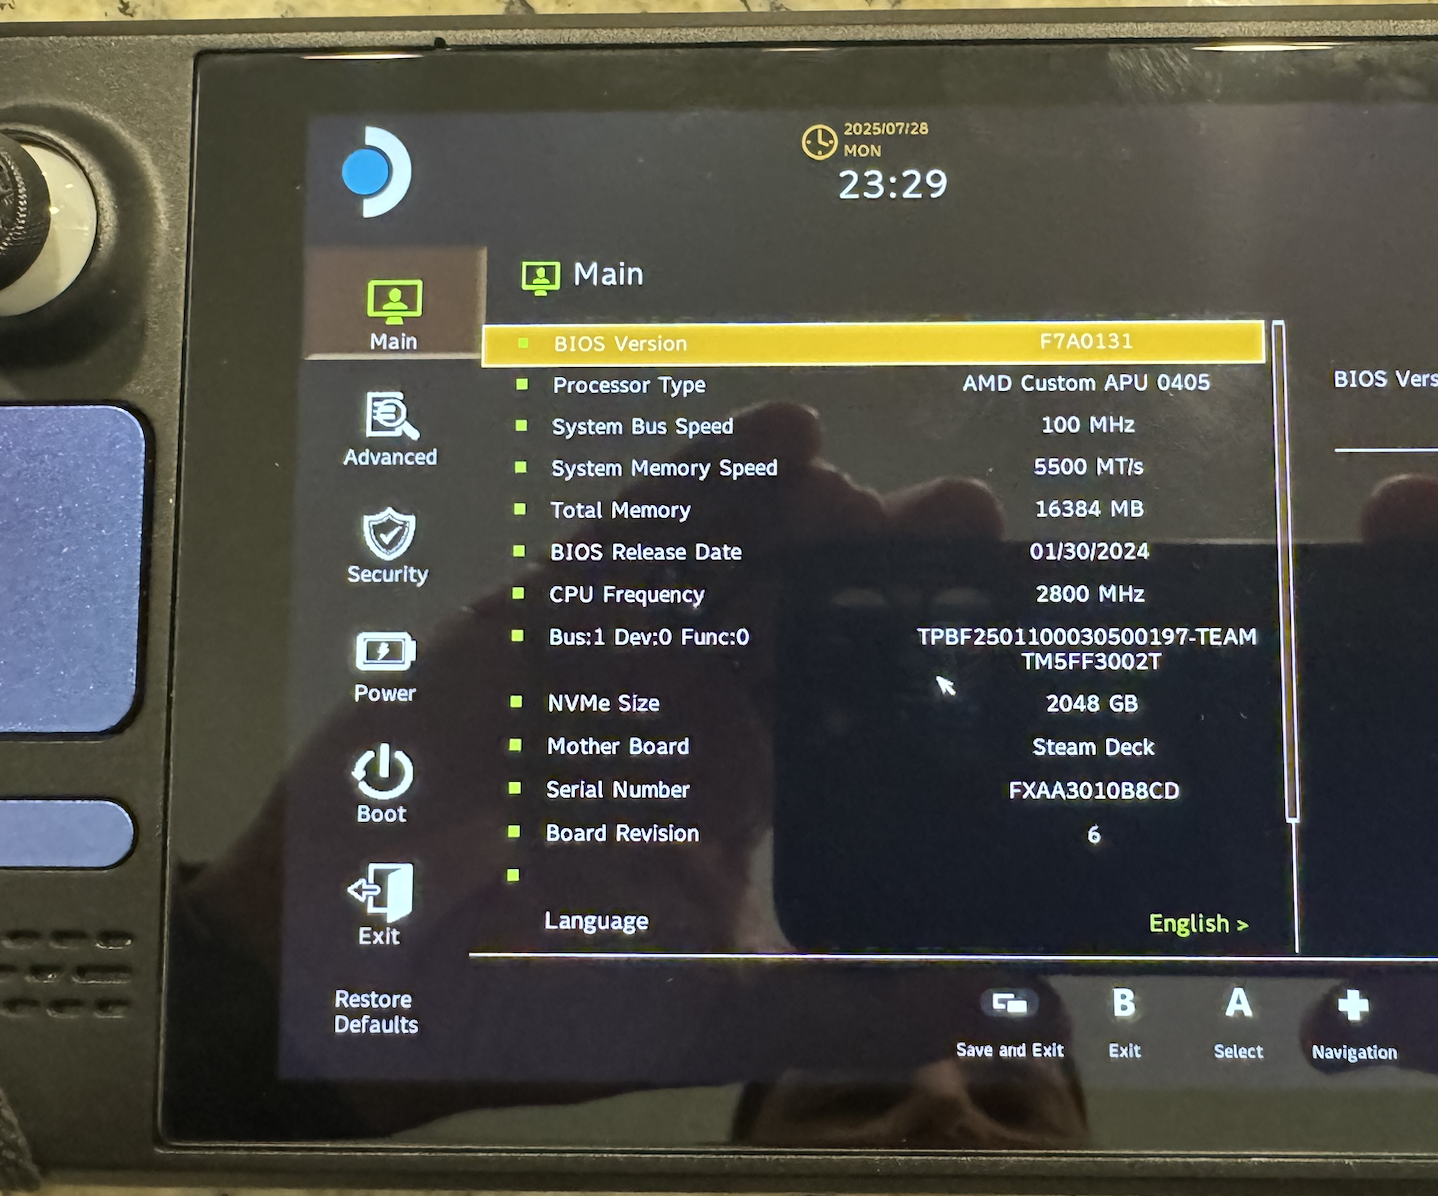
At the time of writing, the latest BIOS version is F7A0131 released 1/30/2024.
Step 2.1: Update your BIOS
EDIT: actually, it turns out that there is a more recent BIOS, but you'll have to install it manually for some reason.
At time of writing, the latest BIOS version is F7A0133 from 8/5/24
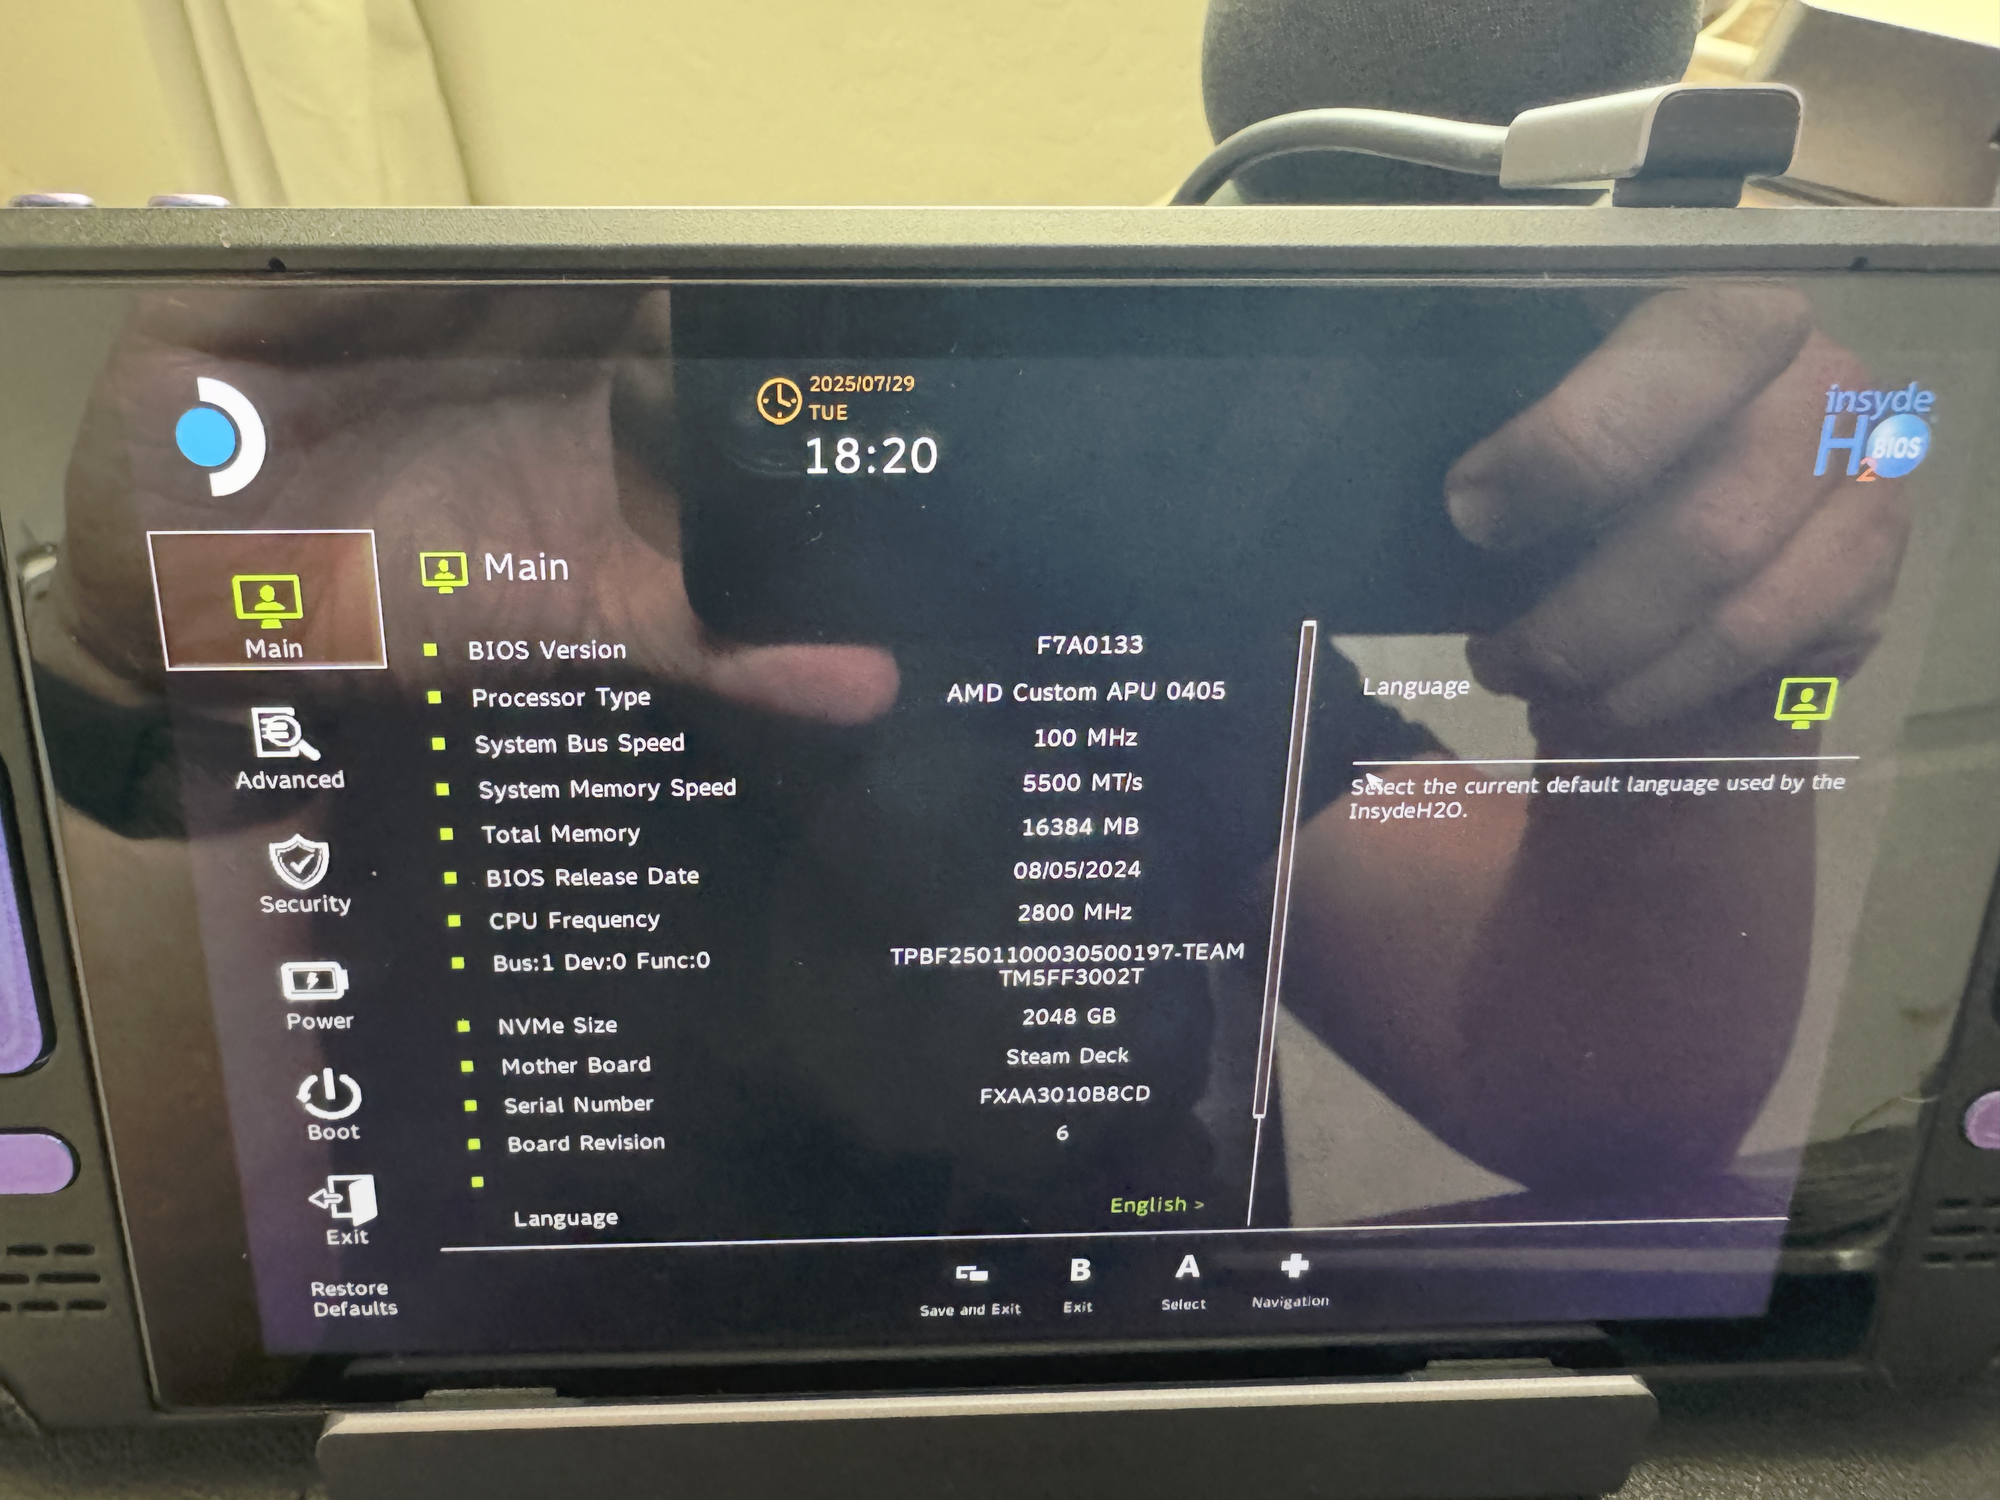

The Steam Deck LCD's model name is "Jupiter". The OLED model is "Galileo". Grab the appropriate BIOS image for your device.
mv ~/Downloads/F7A0133_sign.fd /tmp/bios.fd
sudo /usr/share/jupiter_bios_updater/h2offt /tmp/bios.fd
Your Deck will reboot into firmware update mode (looks like a SteamOS loading screen with a progress bar). Once it completes it will reboot again. If it seems "stuck" just let it sit for a bit. It took a couple minutes on a black screen with the fan screaming before my BIOS update completed. Just be patient and let it do its thing. Once its done, boot into the BIOS and verify the new version.
Step 3: Install Windows
On a Windows PC, create a Windows 11 installer (again on a microSD card) with Rufus USB. You'll have to select the 'list USB hard drives' option.
Boot into the Windows installer. To access the bootloader menu on your Steam Deck, fully power it off, then press and hold power + vol up until you hear the beep and release the buttons. Navigate to 'Boot Manager' and select the SD card (sdmmxc) in the list of bootable devices.
Once booted into the WinPE (installer), it's going to be rotated into portait mode for the remainder of the install process (gross).
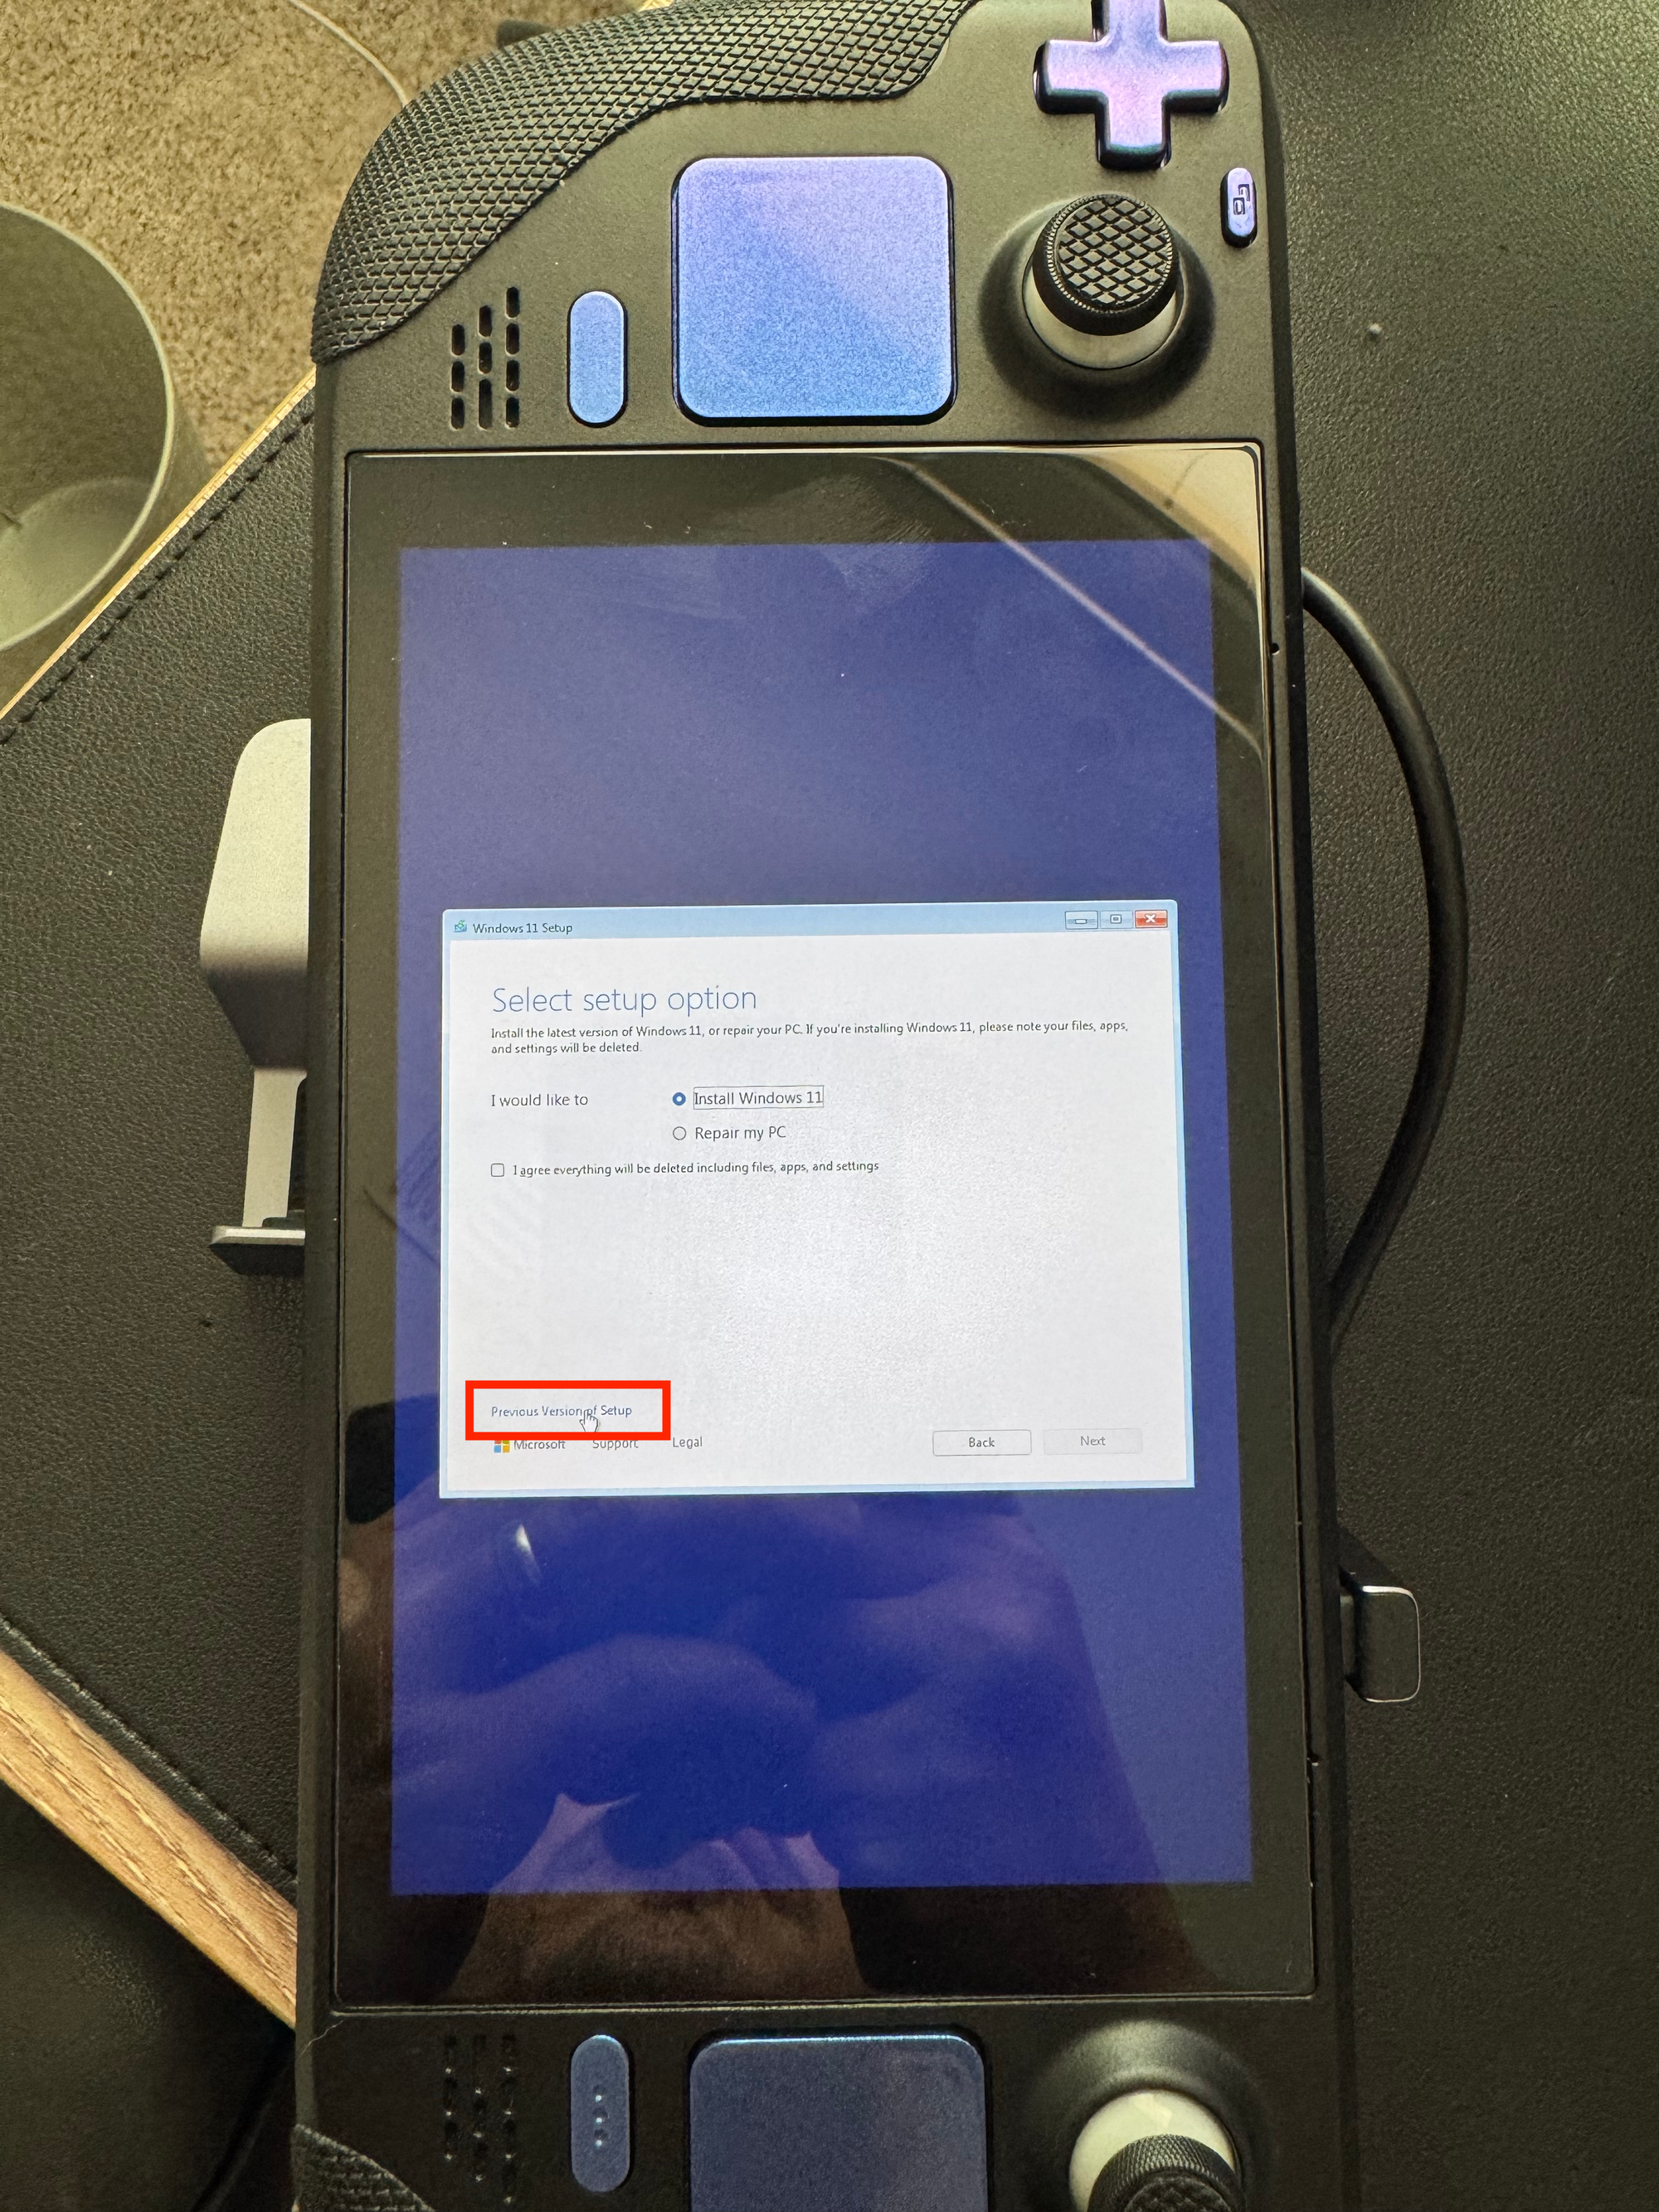
To dual boot Windows you'll have to select 'Previous Version of Setup' in order to get to the advanced partitioning dialogue, otherwise the installer will replace SteamOS with Windows - not what we're after.
Delete the FAT32 partition you created earlier and then select the new unallocated space in order to proceed with the install.
0x80300001 (a common error), simply reboot and try again. If all else fails, recreate your installer.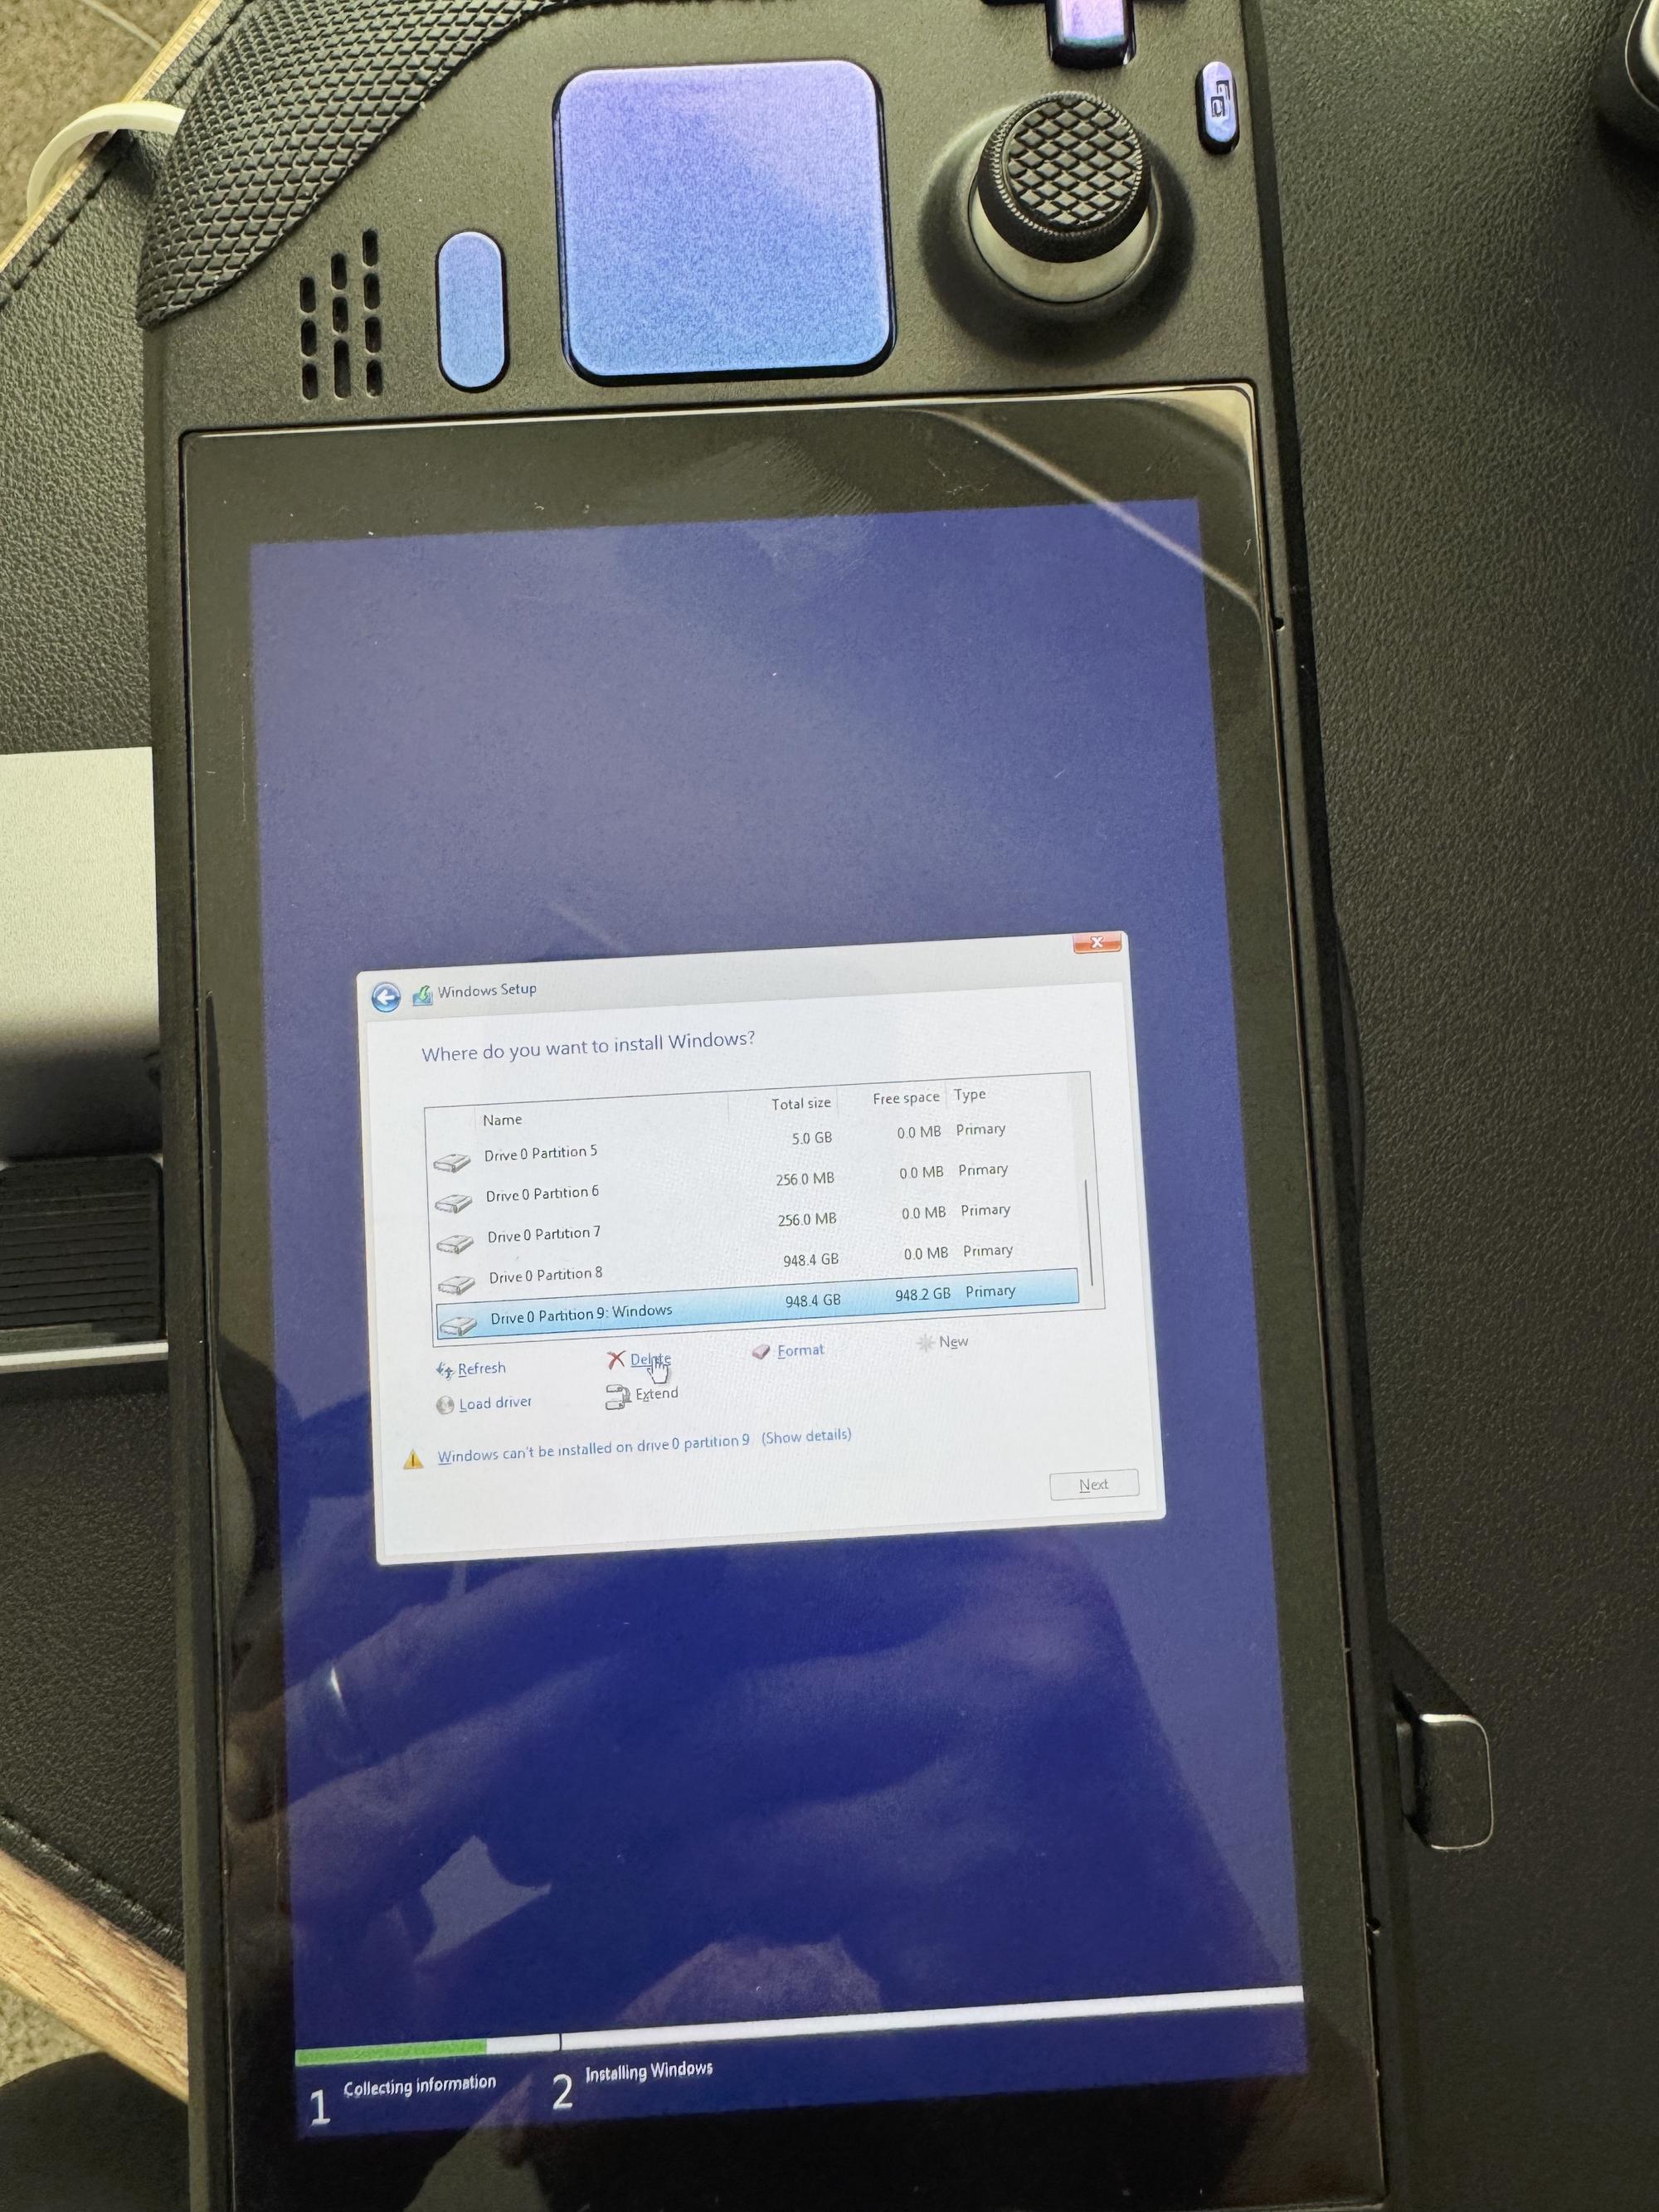
Proceed with the installation. Go grab a cup of coffee. Walk the dog. It's going to be a few minutes. Allow Windows to finish installing and complete the initial account setup for your user.
Step 4: fix dual boot
With Windows successfully installed, at this point you’re facing two issues:
- The Windows bootloader has hijacked your Steam Deck and will only boot directly into Windows.
- If you’ve installed the latest Windows 11 24H2 build, there's a known bug that corrupts the GUID Partition Table (GPT), making SteamOS unbootable.
Thankfully, this is an easy fix. Just boot into the SteamOS Recovery image and use fdisk to restore the backup GPT. Boot up the SteamOS Recovery media, open a konsole window and enter the following commands:
sudo fdisk /dev/nvme0n1
w
q
Then, recreate the SteamOS boot entry with:
sudo efibootmgr -c -d /dev/nvme0n1 -p 1 -L "SteamOS" -l "EFI\\steamos\\steamcl.efi"At this point, you’ll be able to boot into SteamOS from the Boot Manager in the BIOS. However, there’s a catch: once you boot into Windows, every subsequent boot will default back to Windows unless you manually select SteamOS each time. That’s not ideal—especially if you plan to use SteamOS most of the time (which I do).
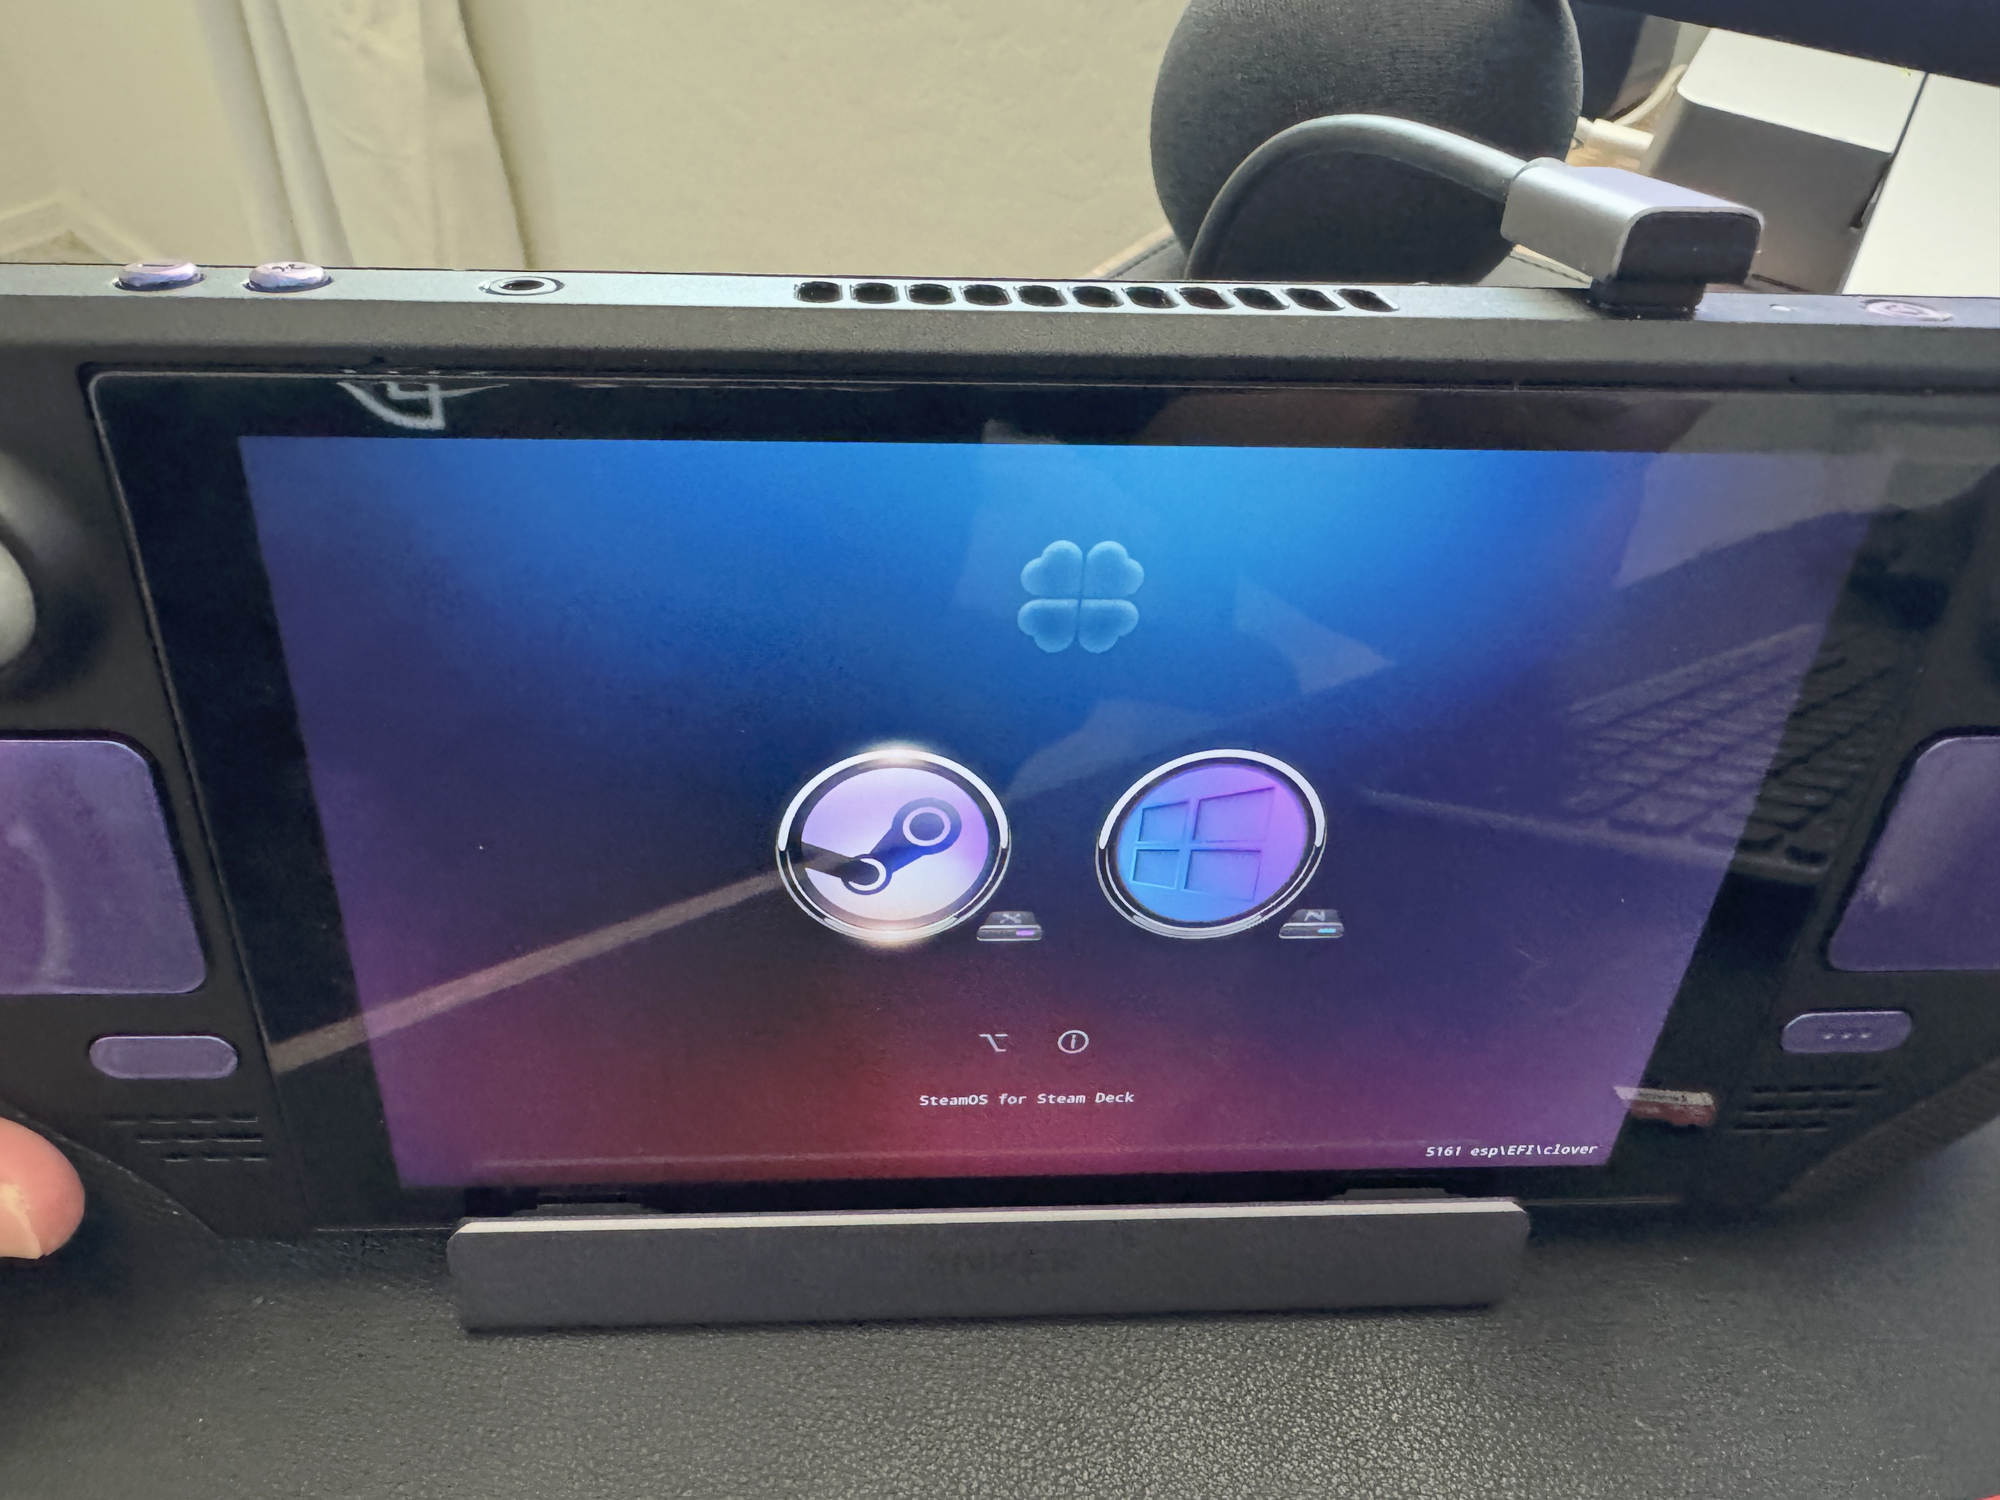
Step 4.1: Install Clover
Fortunately, there’s a simple and elegant workaround: install Clover. Yes, that Clover – the old Hackintosh bootloader. Clover provides a simple graphical interface at boot and lets you easily choose between SteamOS and Windows, effectively preventing Windows from hijacking the boot process again.
Totally optional but highly recommended.
On Windows:
Open a CMD.EXE window with admin privileges and run the following command.
bcdedit.exe -set {globalsettings} highestmode on
Shutdown (not restart) and boot into SteamOS (you'll have to select it through the boot manager menu in BIOS)
On SteamOS:
Drop to Desktop Mode (hold power, select 'Switch to Desktop Mode'). Open a konsole window and enter the following commands:
git clone https://github.com/ryanrudolfoba/SteamDeck-Clover-dualboot
cd ~/SteamDeck-Clover-dualboot
chmod +x install-Clover.sh
./install-Clover.sh
efibootmgr -b 0 -B where zero is the boot entry number. For the most part, the necessary entries are regenerated on the fly every boot. You can view your EFI boot entries with efibootmgr -vThen reboot. On the next boot you should be greeted with the Clover picker screen. The first time I booted into Windows from the Clover bootloader, it ran through a boot repair cycle but you can largely just ignore that.
Step 5: Windows Tweaks
This section I'll go over some things that will make the Windows on Deck experience suck just a little bit less.
Activate Windows
If you haven't already activated Windows, you probably should unless you don't mind the watermark and not being able to change themes/backgrounds. Honestly, nothing happens if you don't activate Windows. You can continue using it unlicensed in perpetuity.
I bought a legit Win11 Pro key through Groupon for $12. Seemed a little sketchy, but I figured - hey, if it were actually illegal, M$'s army of lawyers would take it down immediately, and at worst it's a scam and I paid $12 for a bad key. While this is not in any way an official endorsement of Groupon or the third party SI who supply these keys, from my personal experience I bought my key and they emailed it to me less than an hour later, no hassle. I certainly don't condone software piracy and absolutely wouldn't trust any of the "methods" out there to activate Windows without a proper activation key, but I'm also not about to shell out $200 for an operating system I legitimately don't want to use if I don't have to. Seemed like a reasonable compromise.
Install all the Steam Deck drivers
Valve have done some pretty amazing work making Windows on Deck a reality. There will be a couple of devices that still don't have drivers, eg; some random AMD custom chips, but they don't seem to be vital to the Windows experience. Valve provide the essentials - GPU, audio, sdcard reader, wifi and bluetooth. Grab the drivers for your version of the Steam Deck here:
https://help.steampowered.com/en/faqs/view/6121-ECCD-D643-BAA8
Install Steam
Steam Deck Tools has some dependencies on it for switching controller modes. Install Steam and log in with your account. Make sure to set Steam to launch on login, as it needs to be running for your controller to work properly.

Install Steam Deck Tools
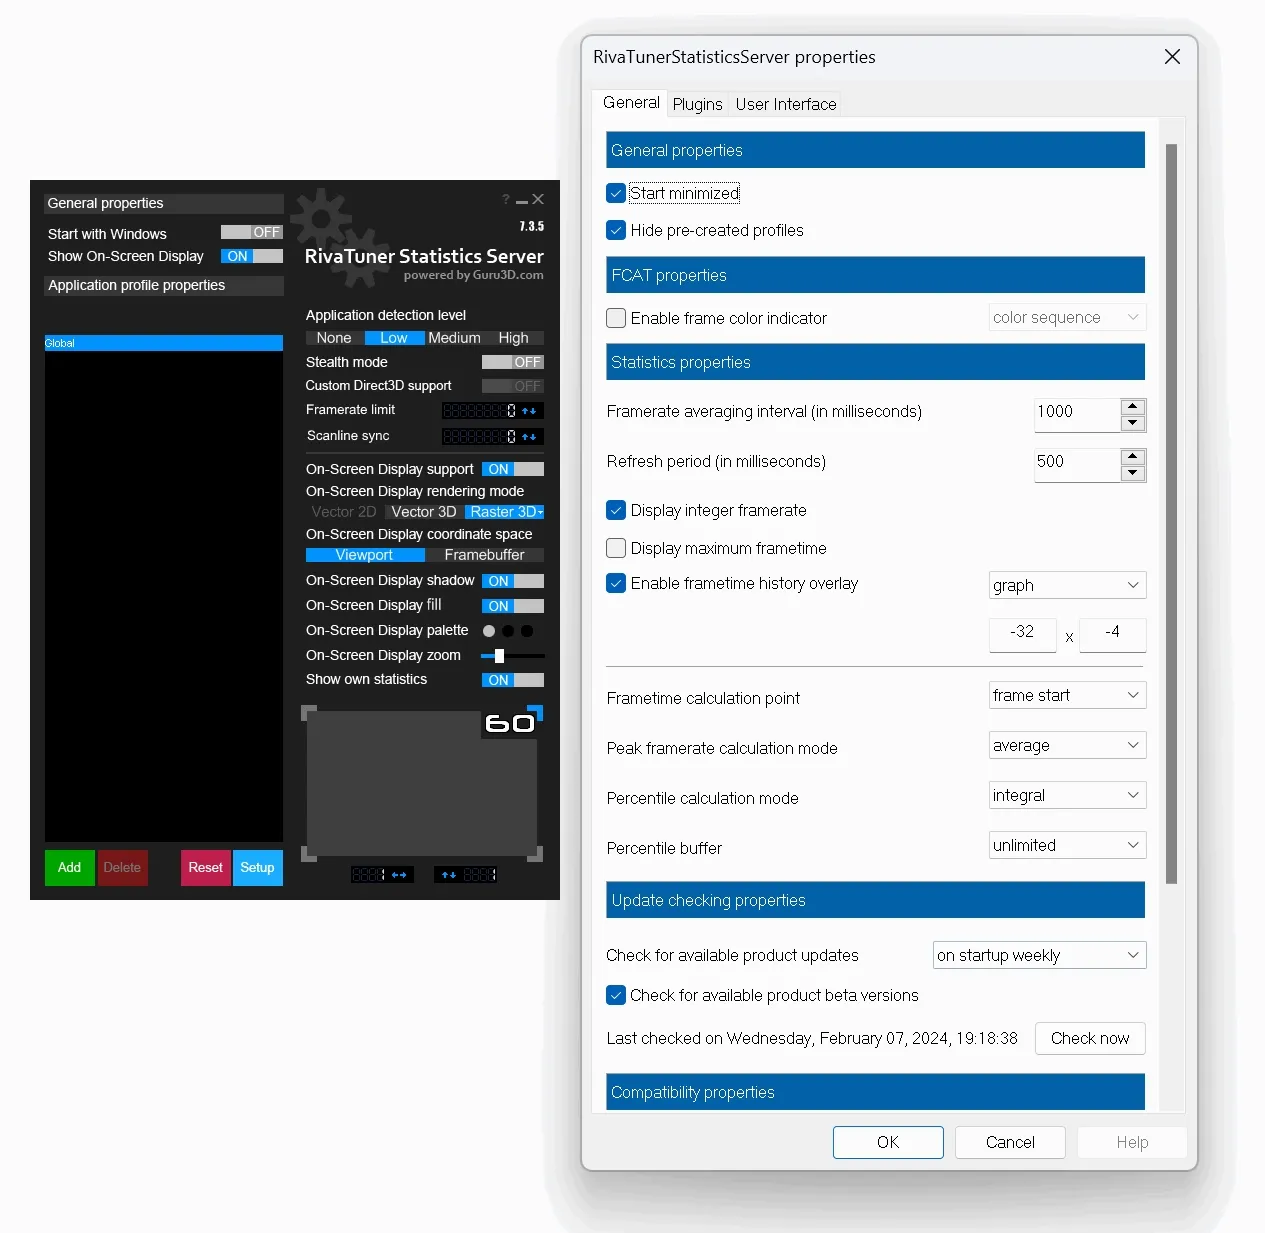
There are actually a handful of 3rd party tools out there aimed at making the Windows gaming experience on Steam Deck a little more smooth, but this is the one I found to be the most straight forward. Steam Deck Tools installs 4 different plugins - Controller, Power Control, Fan Control and Performance Overlay - the latter 3 of which have a dependency on Riva Tuner Statistics Server.
The most important one though is the Steam Controller app which lets you switch between Desktop mode (thumb stick and shoulder buttons control the mouse), Dual Shock 4 or Xbox 360 controller modes. I've found that Dual Shock 4 tends to be the most compatible, eg; with Minecraft and Fortnite. Had issues with Xbox 360 mapping to the right buttons.
Debloat Windows 11
Caveat emptor. There is always a possibility that removing things that are supposed to be baked into Windows could break things in future updates. I'm willing to live with that for a less invasive and less bloated experience. I personally remove just about all "apps" except Xbox and the MS Store, and anything and everything having to do with advertising or AI.
https://github.com/builtbybel/Bloatynosy/releases
The latest build of BloatyNosy causes an unrecoverable Explorer.exe crash loop if you run the 'Dumputer' script. I haven't dug into exactly what causes the crash, but I can't recommend using it. Womp womp. You can still use the 'Features' settings to disable a bunch of annoying things like ads though.
On the other hand, you can still use winscript https://github.com/flick9000/winscript/releases
HYPERVISOR_ERROR after installing the AMD APU drivers, so apparently Hyper-V is required. Virtualization based security related maybe?Auto logon
This is totally optional, but for a handheld with no keyboard, not having to type in a password just to play some Fortnite is one less hurdle. You can grab the official Windows Autologon tool from the link below. Just run the utility, type in your password once and you're good to go. One thing to note - if you do sleep your Steam Deck while using Windows, you will have to type your password to unlock it when you wake it back up.
https://learn.microsoft.com/en-us/sysinternals/downloads/autologon
Windows Updates
Updating Windows is the most proactive thing you can do to shore up potential security issues. It's no secret that Windows is wildly insecure, so every little bit helps.
Make Windows 11 more touch friendly
Since the Windows 8 days, if there is no physical keyboard but there is a touch screen attached, Windows is supposed to default to "Tablet Mode". For whatever reason, on the Steam Deck it doesn't. You can enable two registry tweaks that will make your life a little easier (and behave the way Windows 11 does out of the box on the ROG Ally).
Enable Tablet Mode Taskbar
This makes the task bar larger with bigger, more touch friendly icons and autohides by default, but places a "grabber" down at the bottom of the screen that allows you to pull up the taskbar more easily. Swiping further up will open your start menu. HKEY_CURRENT_USER\Software\Microsoft\Windows\CurrentVersion\Explorer\TabletPostureTaskbar =1
Enable On-Screen Keyboard in text fields
This registry edit enables a setting that will automatically bring up the on screen keyboard any time you tap on a text field - kind of important for a device that has no physical keyboard, don't you think?HKEY_CURRENT_USER\Software\Microsoft\TabletTip\1.7\EnableDesktopModeAutoInvoke =1
followed by a reboot
At long last, all that work just to be able to play a little Fortnite.
Steam Deck Mods
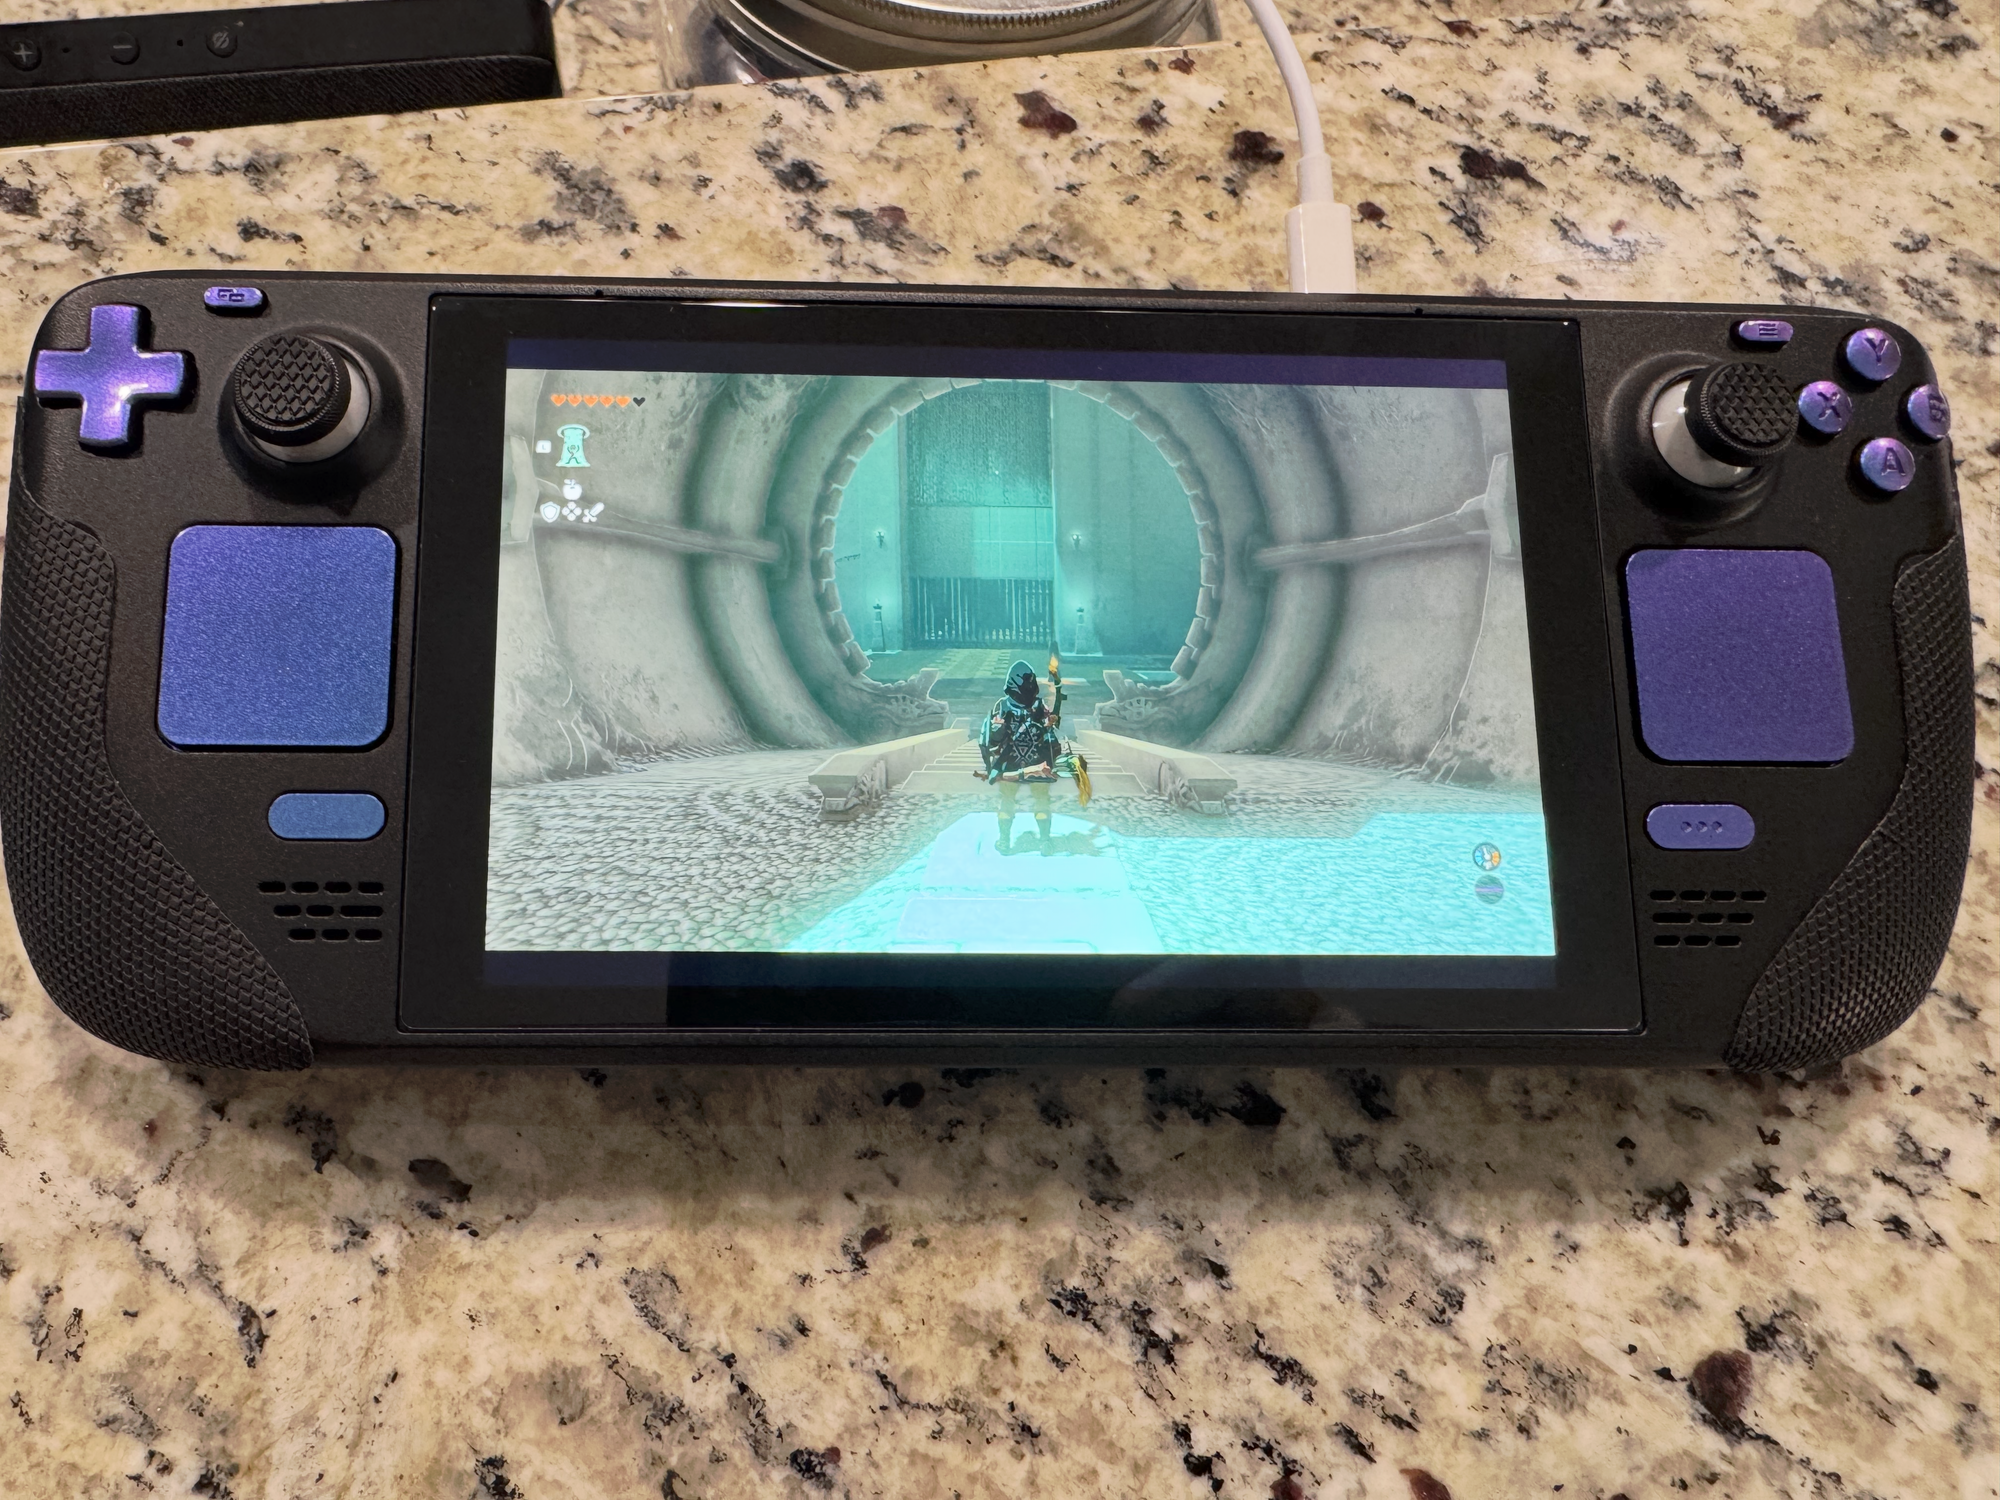
I mentioned earlier that the Steam Deck is almost infinitely hackable—and I wasn’t kidding. It’s incredibly easy to disassemble: no tamper-proof Torx or weird tri-lobe screws here. Every single screw in the device is a standard #0 Phillips. From a modding or repair standpoint, nearly every component lives on its own daughterboard, secured with screws (not glue or solder), and can be individually swapped out. There are no nasty surprises like proprietary SSDs or BIOS whitelists to deal with, either.
Sure, I wish Valve had included a DIMM slot for memory upgrades, and yeah, the Wi-Fi/Bluetooth/RAM/CPU are soldered down. But given how compact this thing is, they had to cut depth somewhere. To their credit, Valve has committed to selling replacement parts through iFixit—though in practice, they’ve only followed through on a handful of parts, mostly limited to the OLED model. Still, compared to just about any other gaming device out there, the Steam Deck is a breath of fresh air from a right-to-repair standpoint.
Now let’s talk mods.
The Deck has a thriving aftermarket scene, and I’ve made some solid upgrades to mine:
- Swapped the stock 64GB SSD for a 2TB drive (nice!)
- Added a 1TB SD card for extra storage
- Replaced the thumbsticks with Gulikit Hall Effect sticks
- Installed a “clicky” button mod (replaces membrane switches with mouse-style tactile ones)
- Swapped the stock buttons for chrome purple ones from ExtremeRate
- Added Talon Gaming rubber grips for improved comfort
Every single one of these improved the Deck’s performance or usability in some way, but if you only do one mod, go for the Hall Effect thumbsticks—they made the biggest difference with the least hassle, and they only cost about $30. I wish I'd taken pictures while performing open heart surgery on my deck, but I really just wanted to get it back together and admire my handywork.
The only "gotcha" I encountered while doing the button swap was with the rear 4 paddles. On the stock shell, they are held in with plastic welds which I had to dremel flush to remove, and then secured the new ones in place with a couple dots of super glue. Not ideal, and if you buy an aftermarket back shell, they all come with threaded screw holes for the paddles.
MEDA set them to A. If the Controller ID starts with MHDA set them to B.Software Mods
On the software side, I’m dual booting with Windows 11, running the latest SteamOS Beta, and using SDWEAK, a utility that unlocks some powerful tweaks: kernel optimizations, overclocking the screen to 70Hz, disabling framerate limits, manual CPU/GPU tuning, and more.
Now, I’ll go ahead and call myself out here—and I’m sure Nintendo’s lawyers will be lining up outside my house (/s)—but one of the biggest reasons I wanted a Steam Deck was to play my Switch library. Breath of the Wild and Tears of the Kingdom were especially high on the list.
I won’t go into the how (Yuzu already got in trouble for that, and plenty of guides exist elsewhere). But for the record, I own an OG unpatched Nintendo Switch I bought at launch and jailbroke it almost immediately—not for piracy, but for convenience. I work in software and gladly pay for good games, especially titles as incredible as recent Zeldas. I just prefer having my library on an SD card over juggling those tiny (not to mention expensive) game carts.
But over time, the constant re-jailbreaking after a dead battery (a common event as anyone with kids will tell you) and the endless cycle of drifting Joy-Cons killed the joy. Add in the inevitable SD card corruption on a jailbroken Switch—I've lost my Tears of the Kingdom progress multiple times—and eventually I just gave up.
Ironically, being able to play my Switch titles on my Steam Deck means I don't have to jailbreak anymore, and now that the Switch 2 is out there probably aren't going to be any more big games coming out for the original Switch. Not only that, but now I can play my games on a device with a bigger screen, higher resolution, better FPS, better battery life, faster load times, and (thanks to the hardware mods I've installed) far superior controls. All in all, it is a better experience than the "official" Nintendo experience.